
SUPPORTS
We provide a variety of support services and information for our customers.
- Quick guide
- Video tutorials
- Remote assistance
Quick guide
- # Hardware configuration
- # Installation
- # Preferences
- # Order and payment
- # h.STORE User Manual
- # Receipt inquiry
- # Settings
- # Connect and order
- # Change language
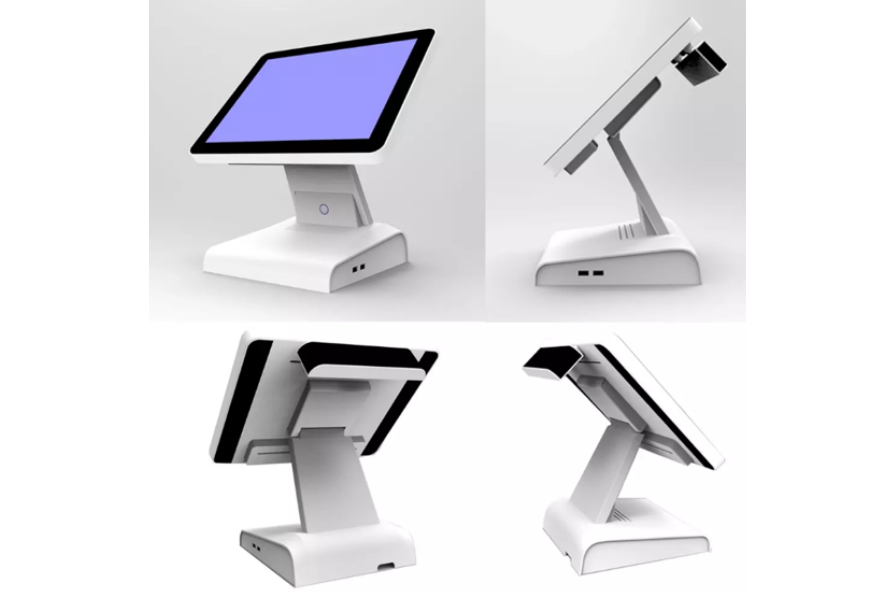
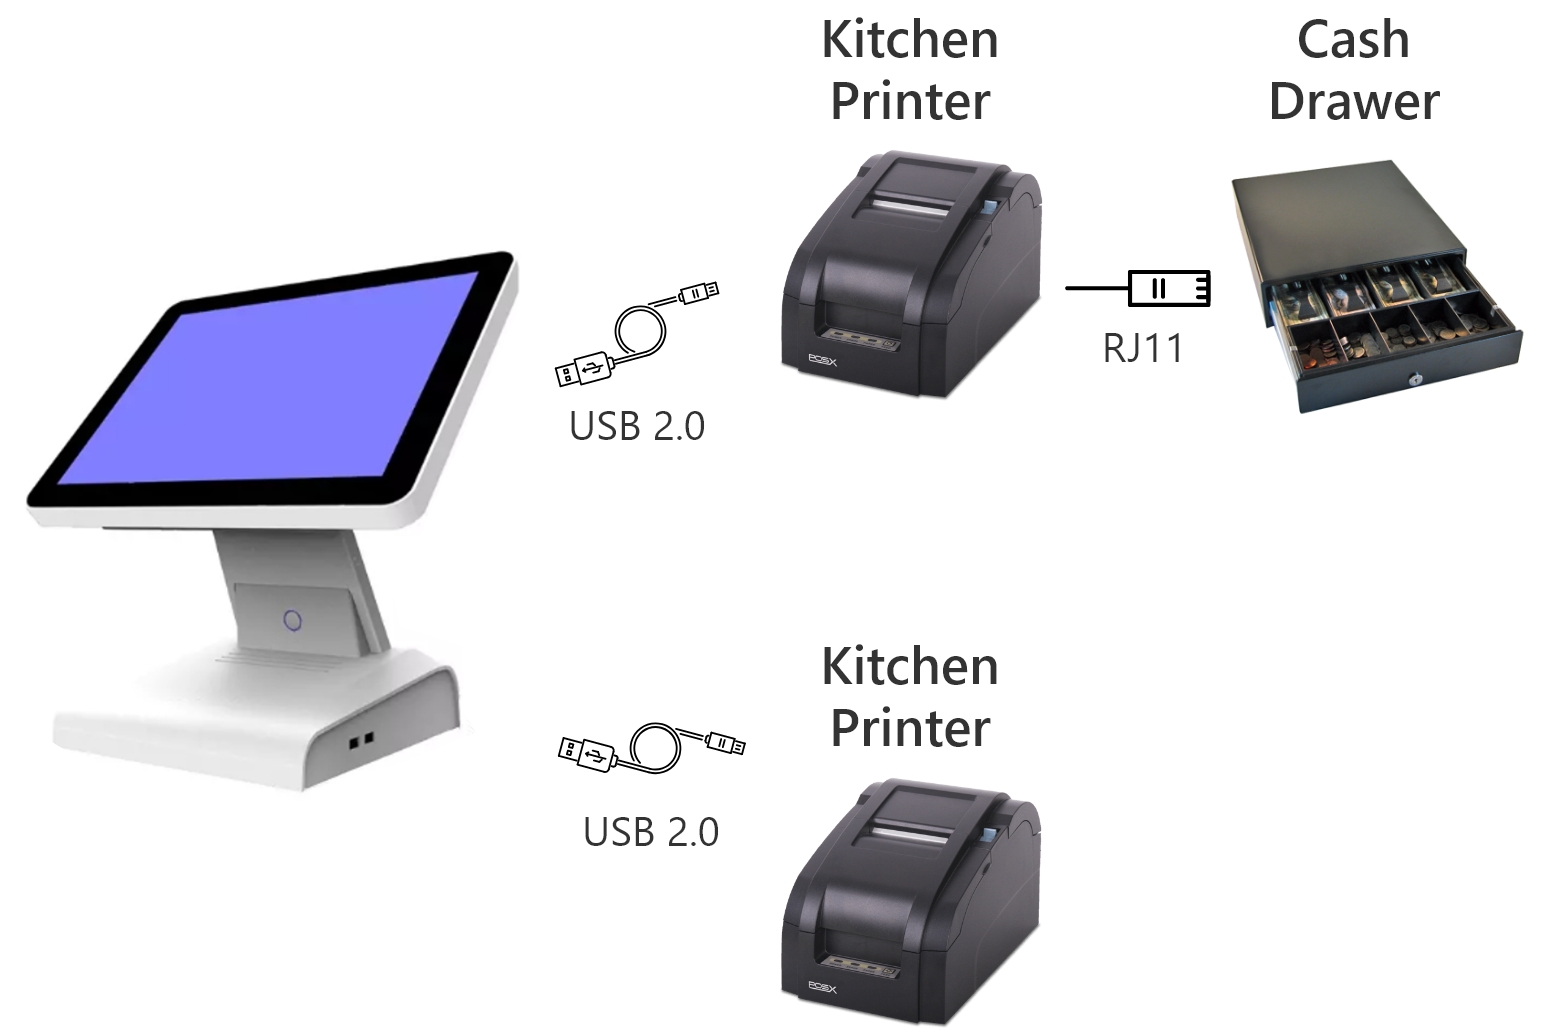
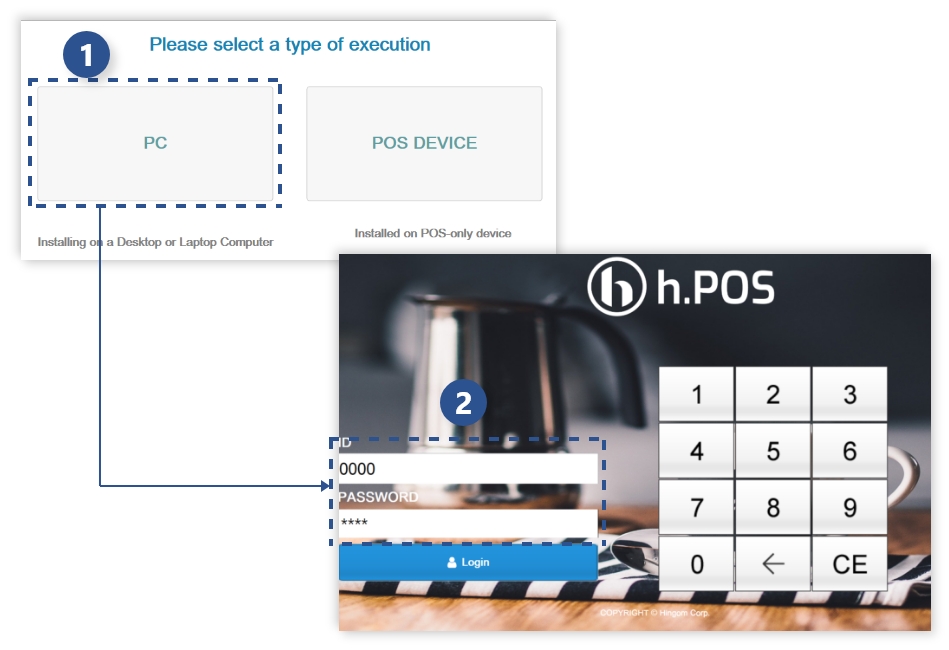
H/W CONNECT
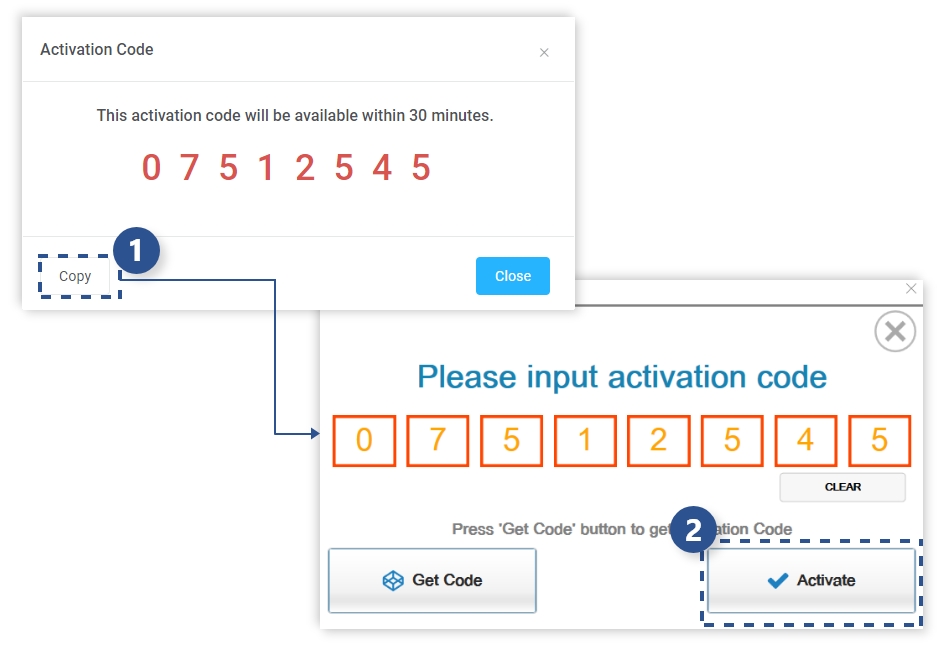
License ACTIVATION 1
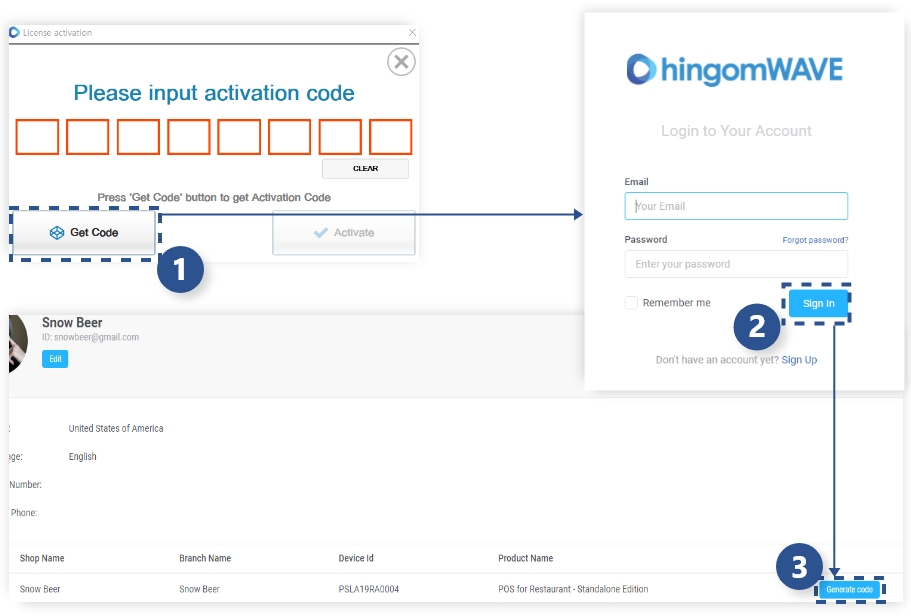
The process of registering a license through a user account
https://hingomwave.com This is the process of activating the purchased license. When first run, you can see the Activation Code screen
1 Click Get Code, then log in
2 Log in after entering user account information( Accounts signed up through the homepage )
3 Click Generate code to get Activation Code
License ACTIVATION 2
First login
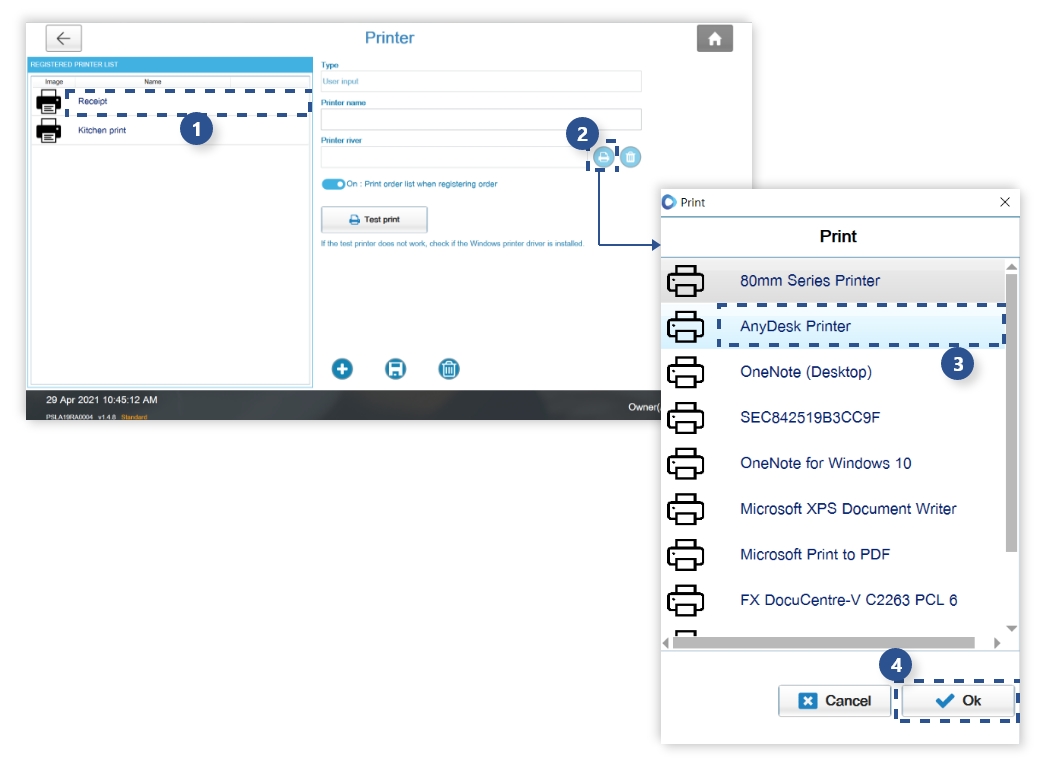
Print settings 1
Print settings 2
Batch product registration
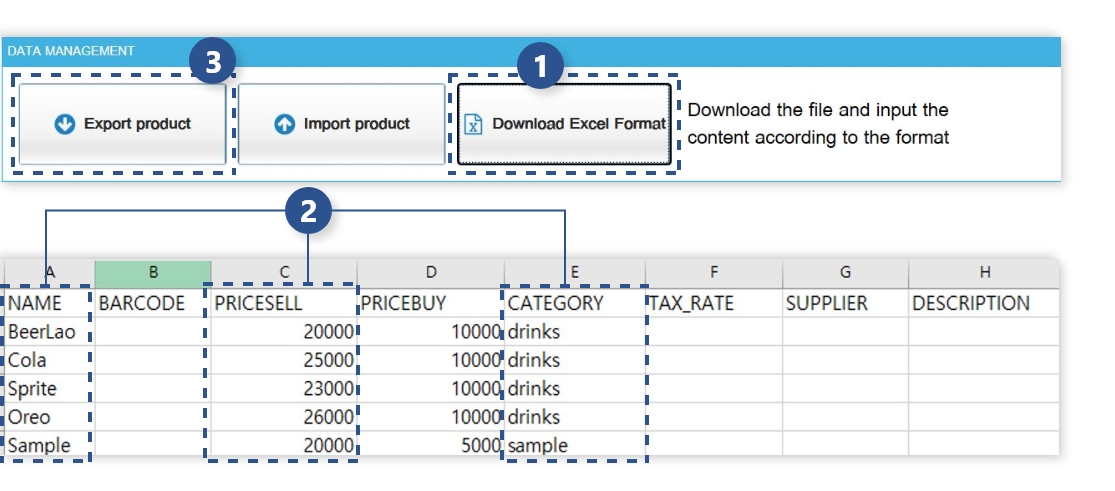
This is the process of registering batch products and is processed in the Management>Import product menu
From the main screen, go to the Management -> Import product menu
1 Download the csv format file for batch registration
2 Enter the required values. (NAME: Product name, PRICESELL: Selling price, CATEGORY: Product category)
3 Click the Import product button to select the Excel file
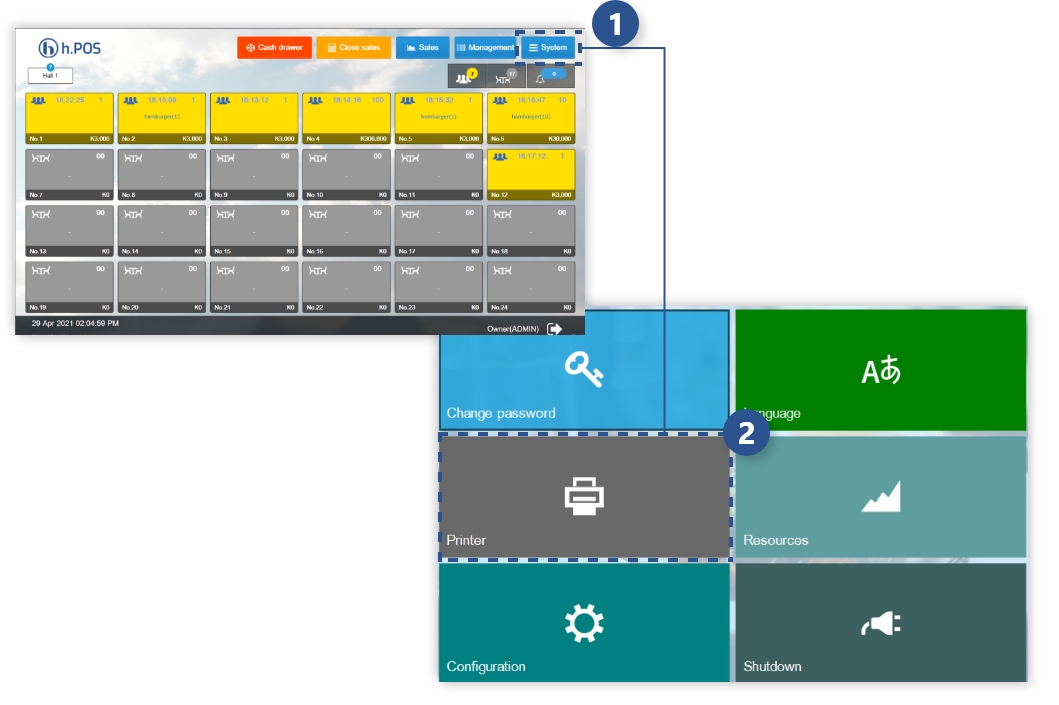
Main screen (restaurant)
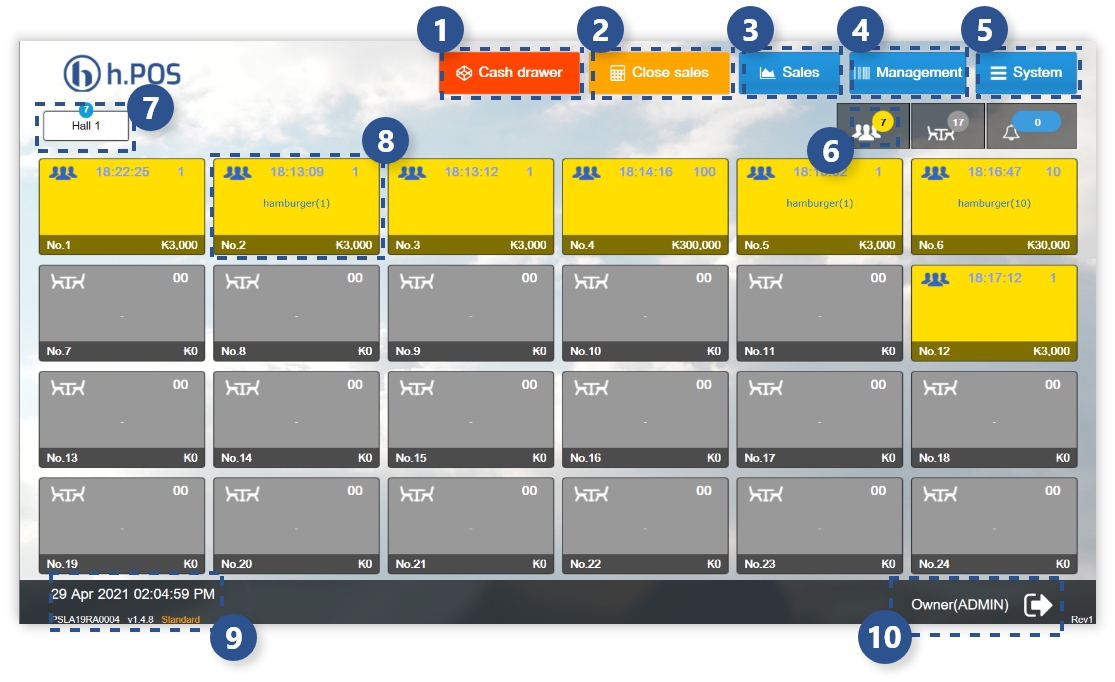
Restaurant main screen where you can see the order status at a glance
1 The cash drawer button works only when the cash drawer is connected to the printer
2 Close sales menu
3 Sales-related menu
4 Product and user-related menu
5 System related menu
6 Display of current in-store order status
7 Classification when there are multiple floors
8 Display ordered table information
9 Current time, terminal ID, and S/W version are displayed
10 Display logged in user name
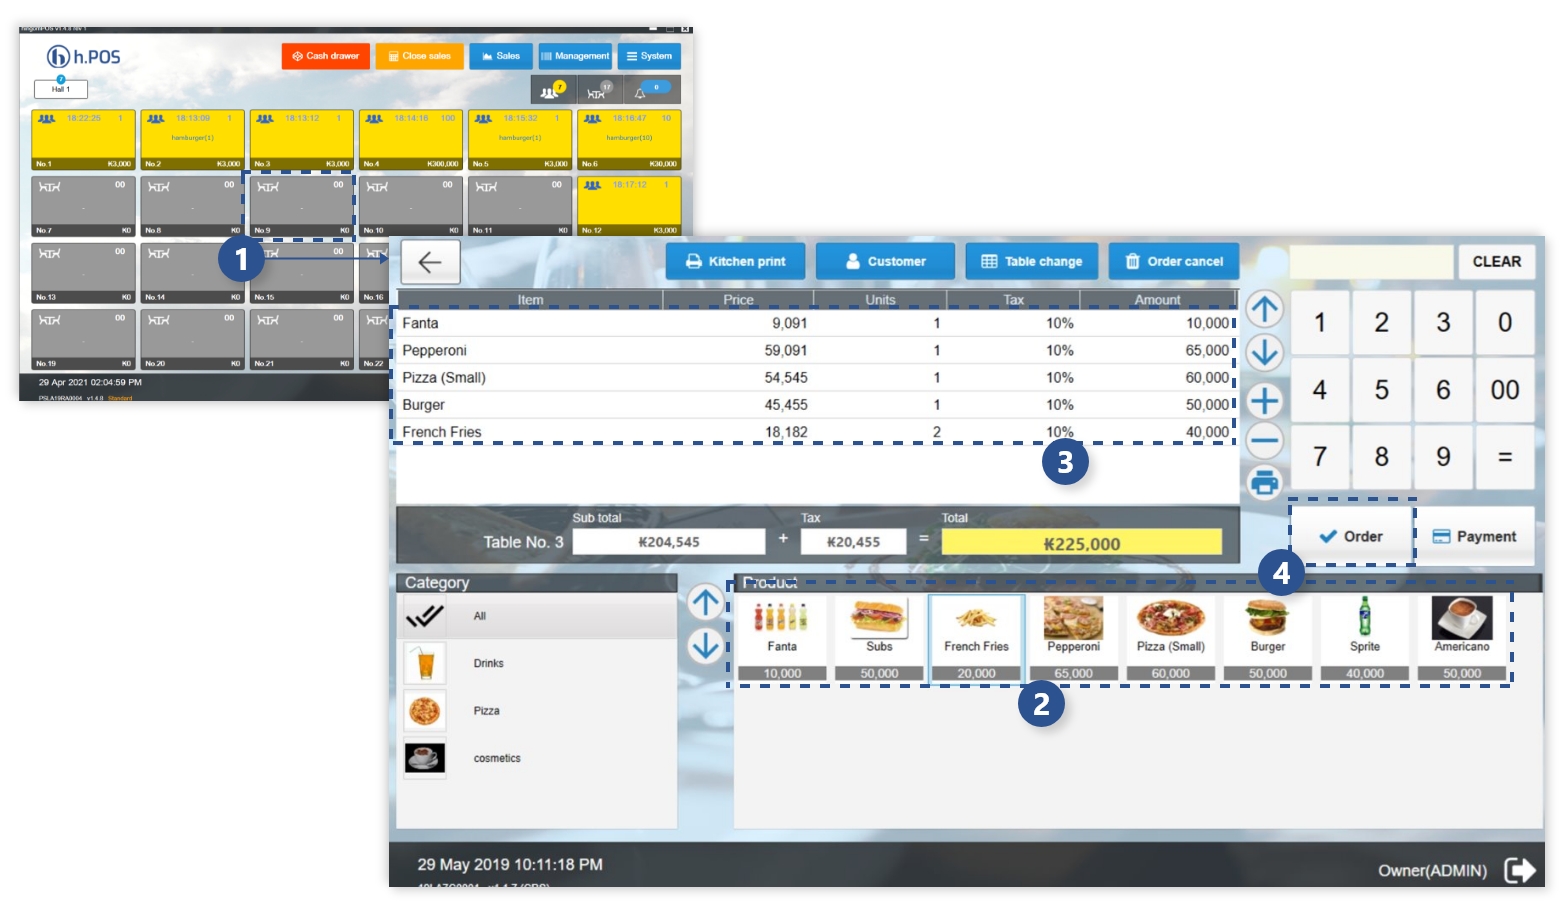
Order
Make a payment 1
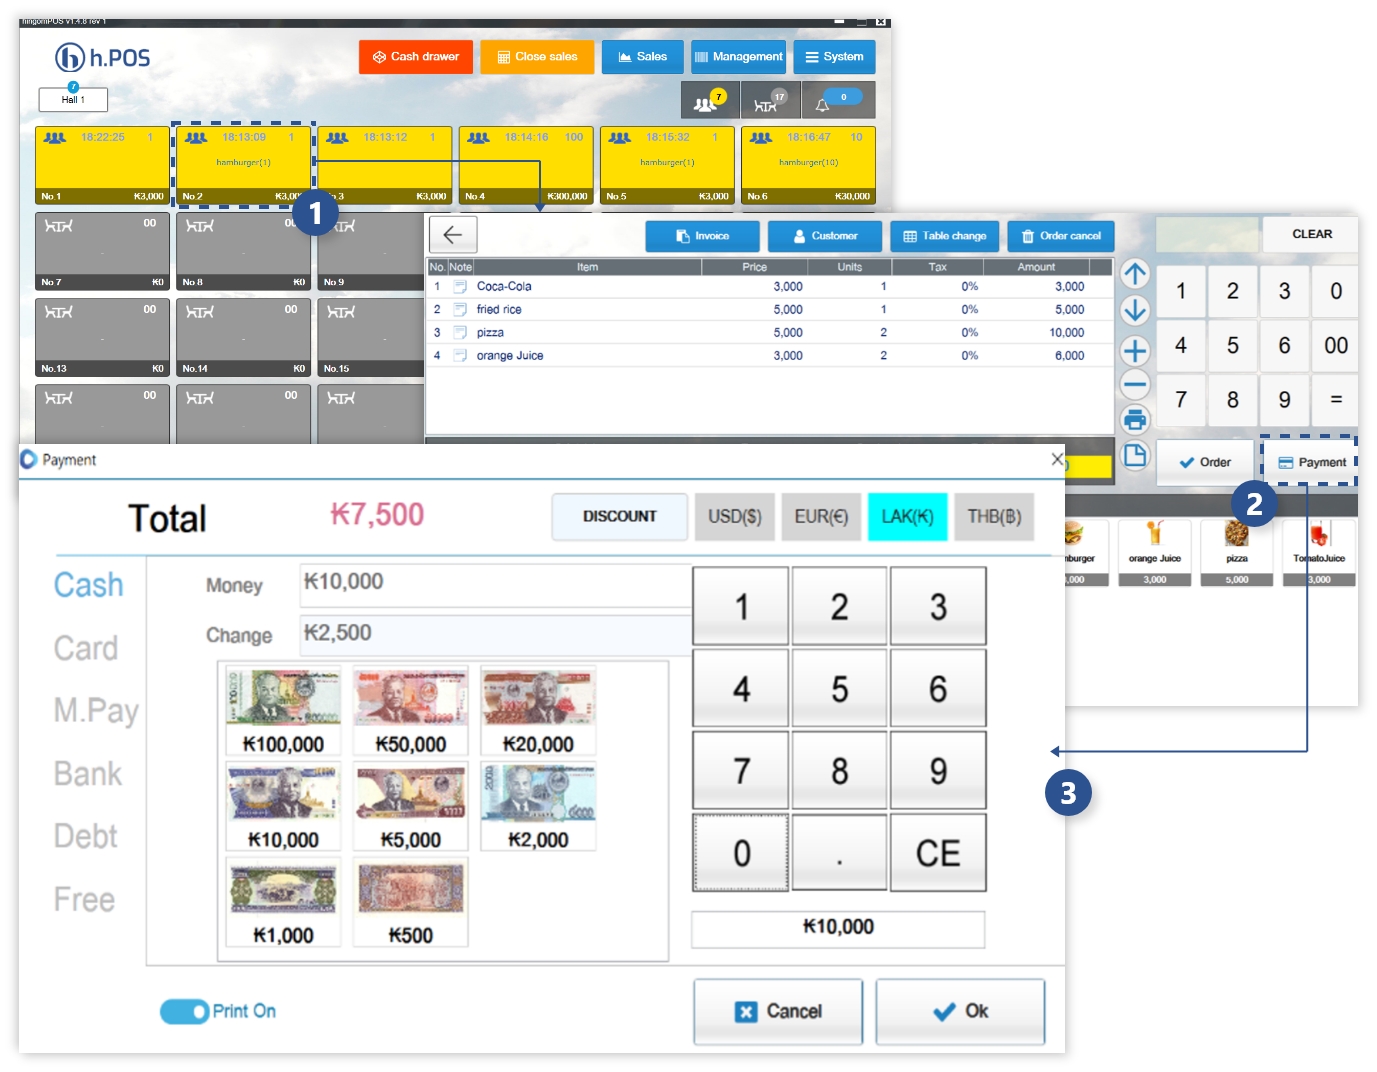
Make a payment 2
Select the amount to be paid and press the OK button
1 Confirm the amount to be paid
2 Select the amount received from the customer (or enter the amount using the number pad)
3 The change money is displayed automatically
4 If the amount to be paid and the amount received are the same or greater, the OK button is activated
5 Change is displayed when you press OK
Login screen
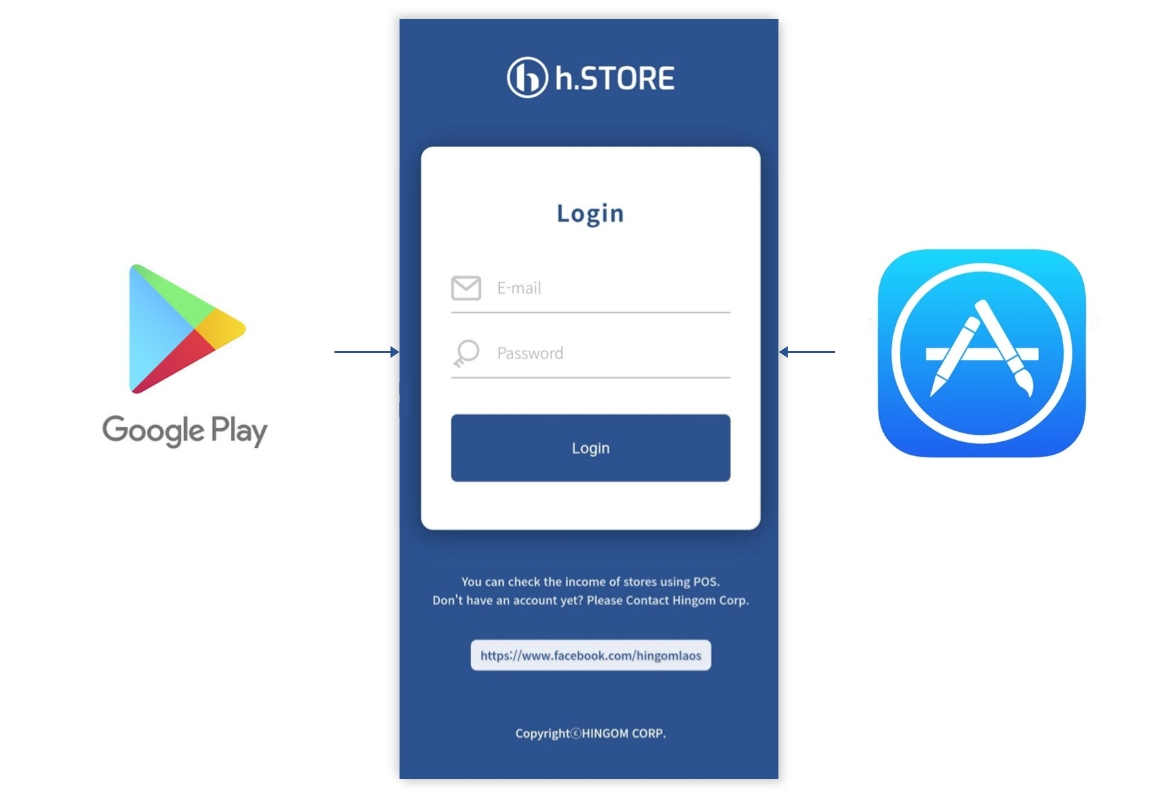
First screen when running App Login
(*Set password change after login)
1 After downloading the app from Google playstore or the App Store Enter your ID(email) and password to log in
Main screen 1
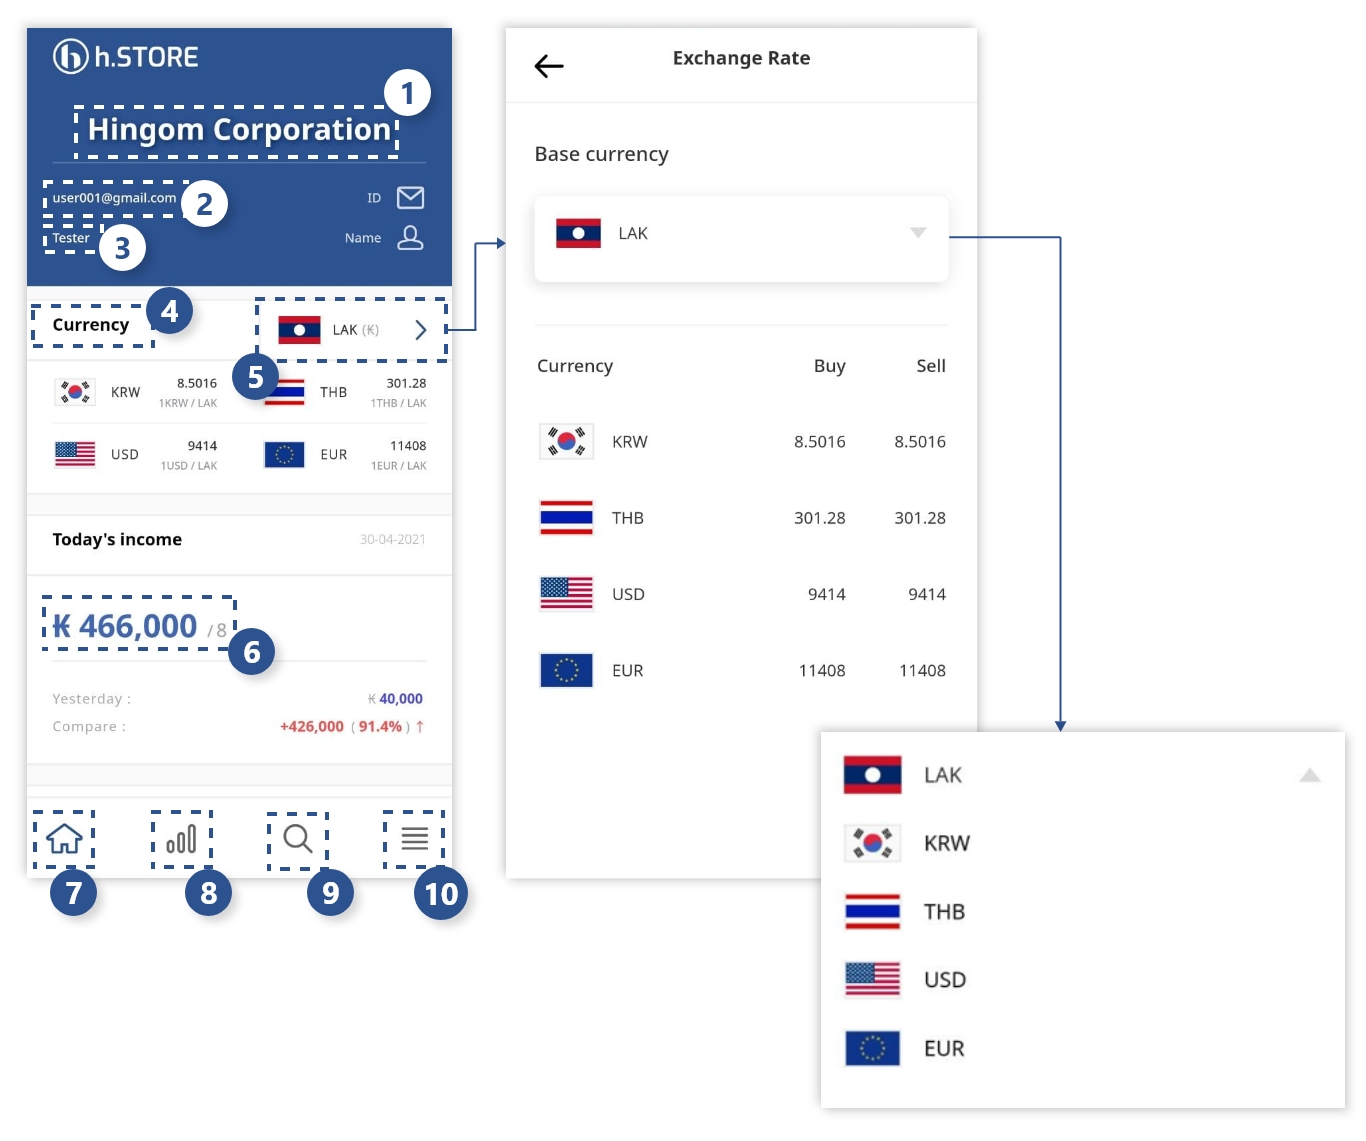
Main screen
1 Store name
2 User ID
3 User Name
4 current base currency
5 base currency change
6 today's sale
7 move to the home screen
8 Sales status statistics
9 receipt search
10 password change
Main screen 2
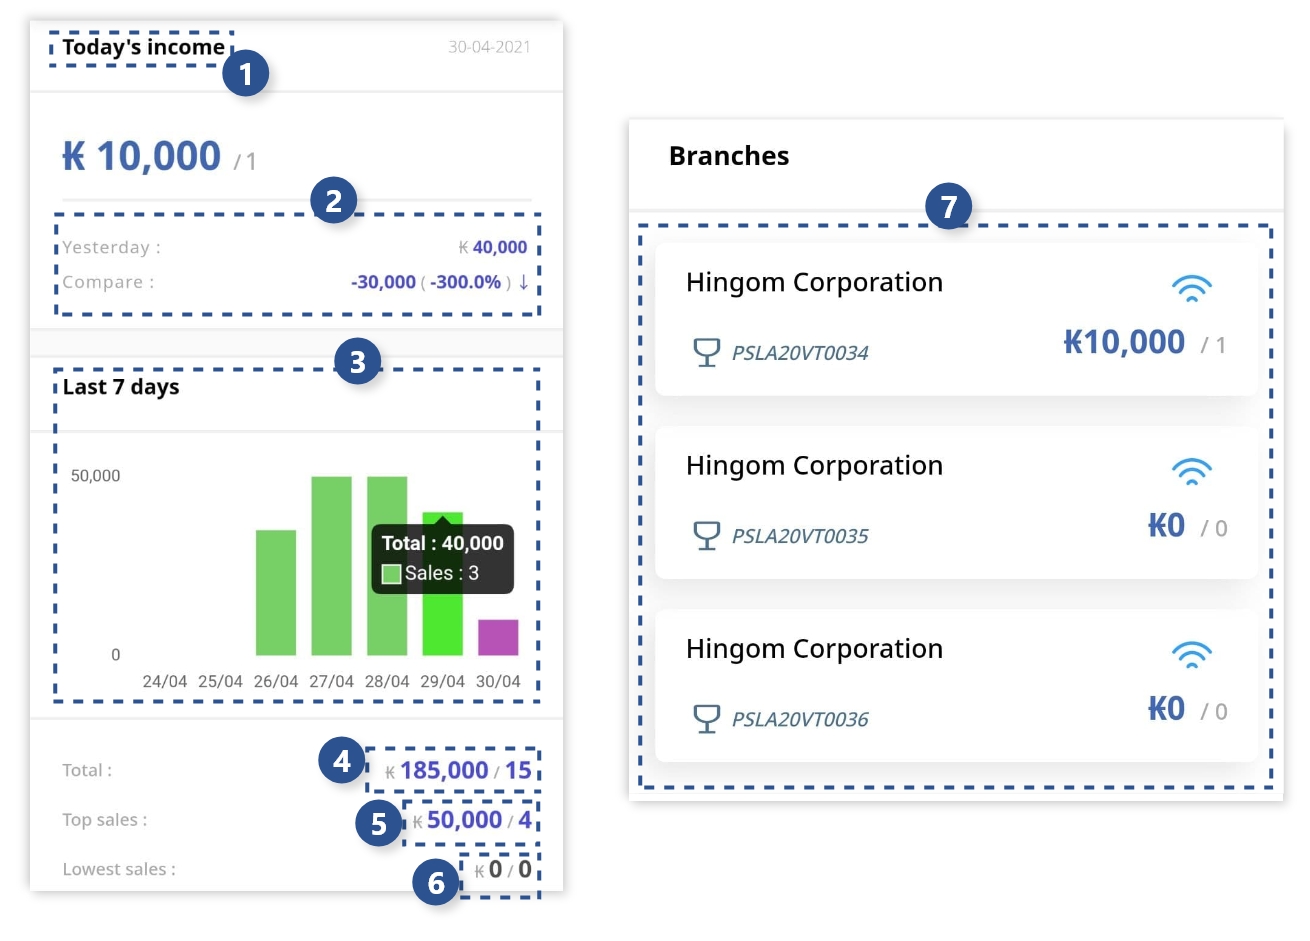
Main screen
1 Sales today
2 sales comparison between yesterday and today
3 sales for the last 7 days
4 total sales for the last 7 days
5 Highest sales in the last 7 days
6 lowest sales in the last 7 days
7 sales amount/quantity by branch
Sales status statistics
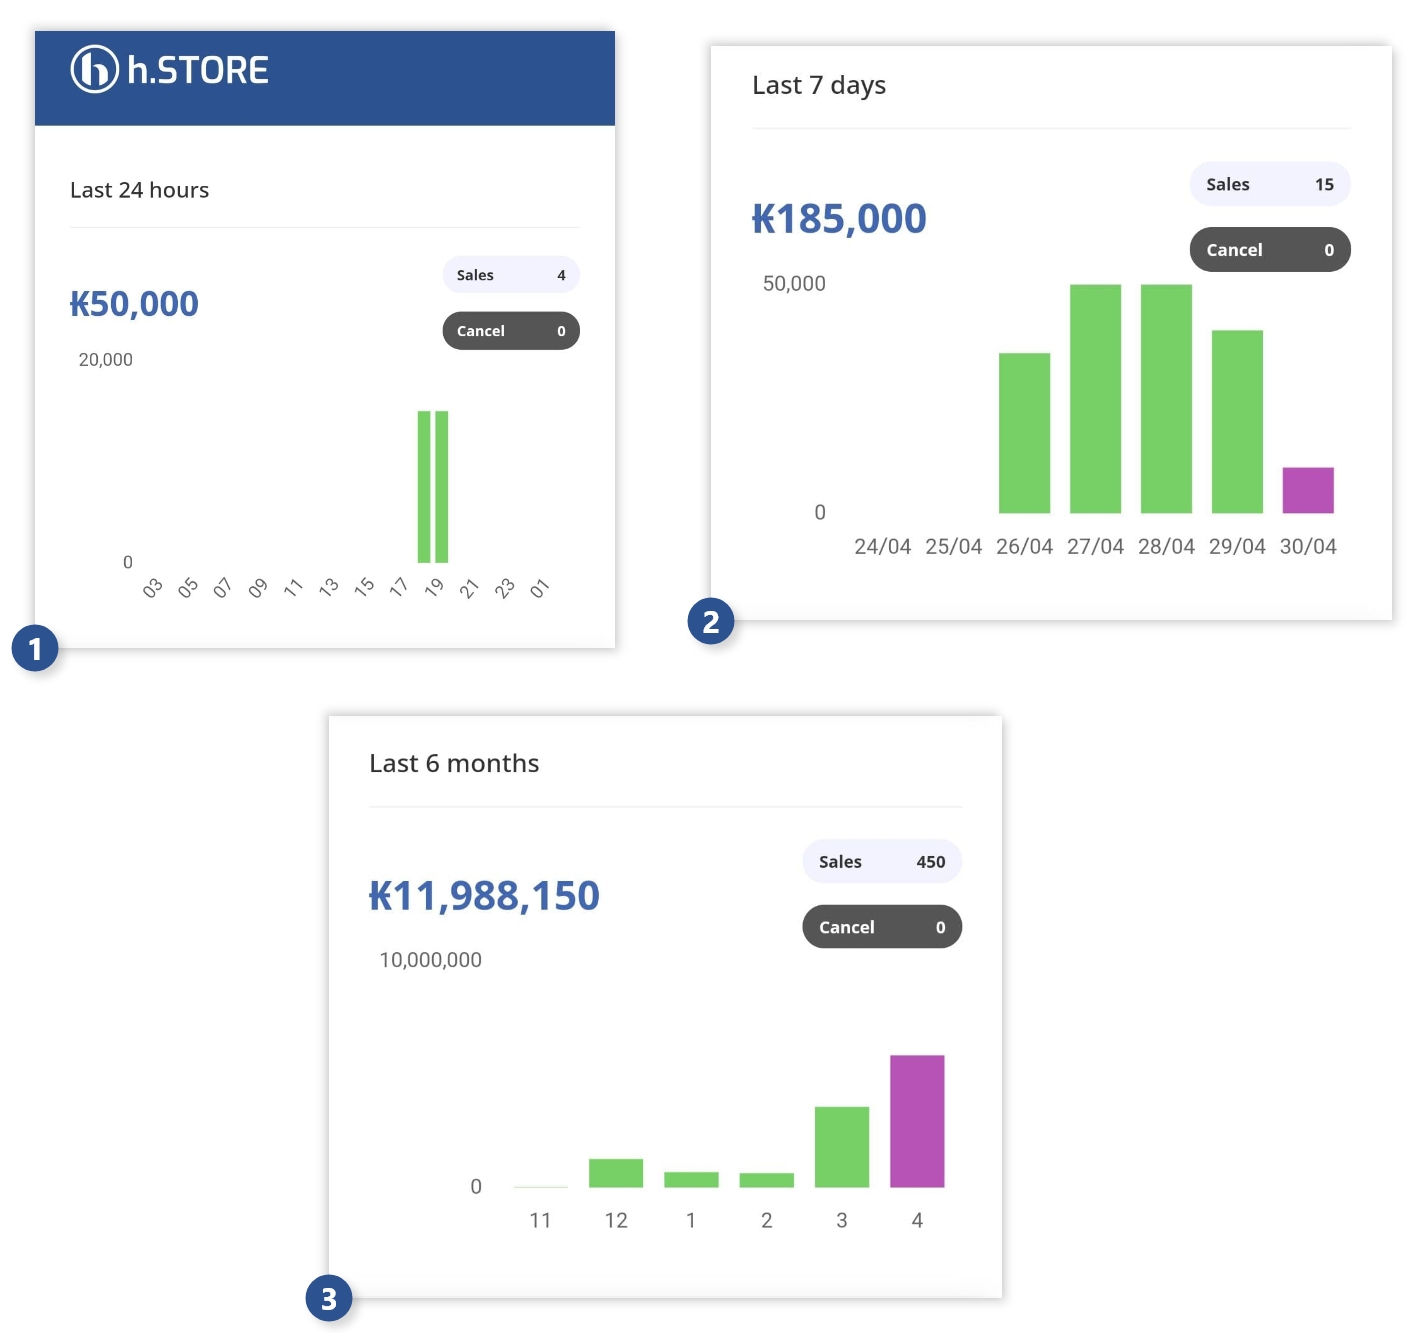
You can check sales status statistics with charts by date and period
You can check the statistics for today / the last 7 days / the last 6 months
1 Sales statistics for today
2 sales statistics for the last 7 days
3 sales statistics for the last 6 months
Sales status statistics by product
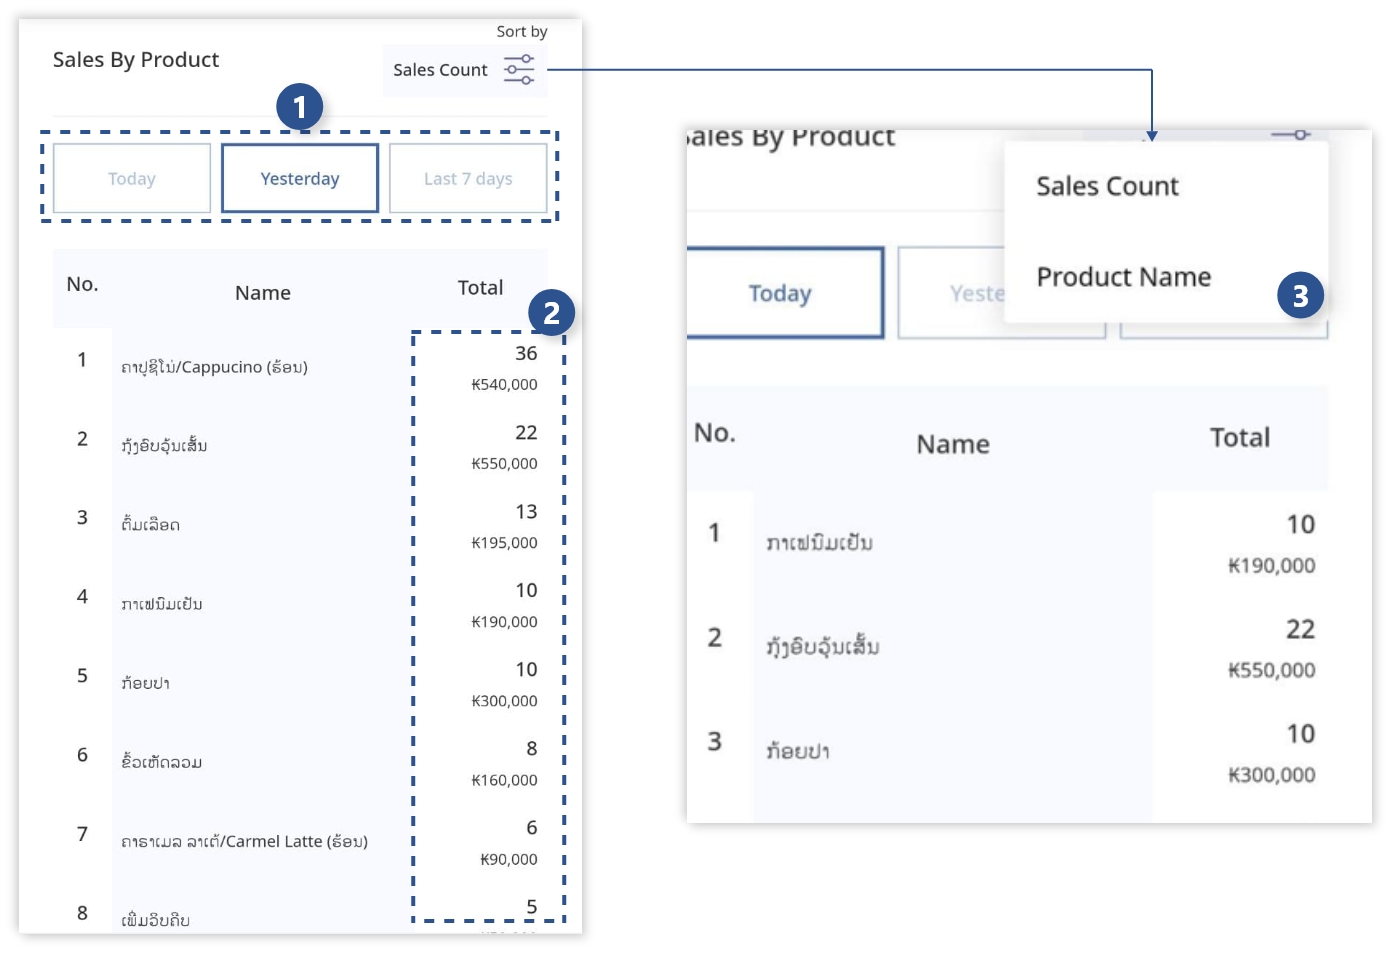
You can check the sales status statistics for each product
1 You can check the details of products sold today, yesterday, and in the last 7 days
2 Sort by best-selling products
3 Sorting method can be changed
Receipt inquiry
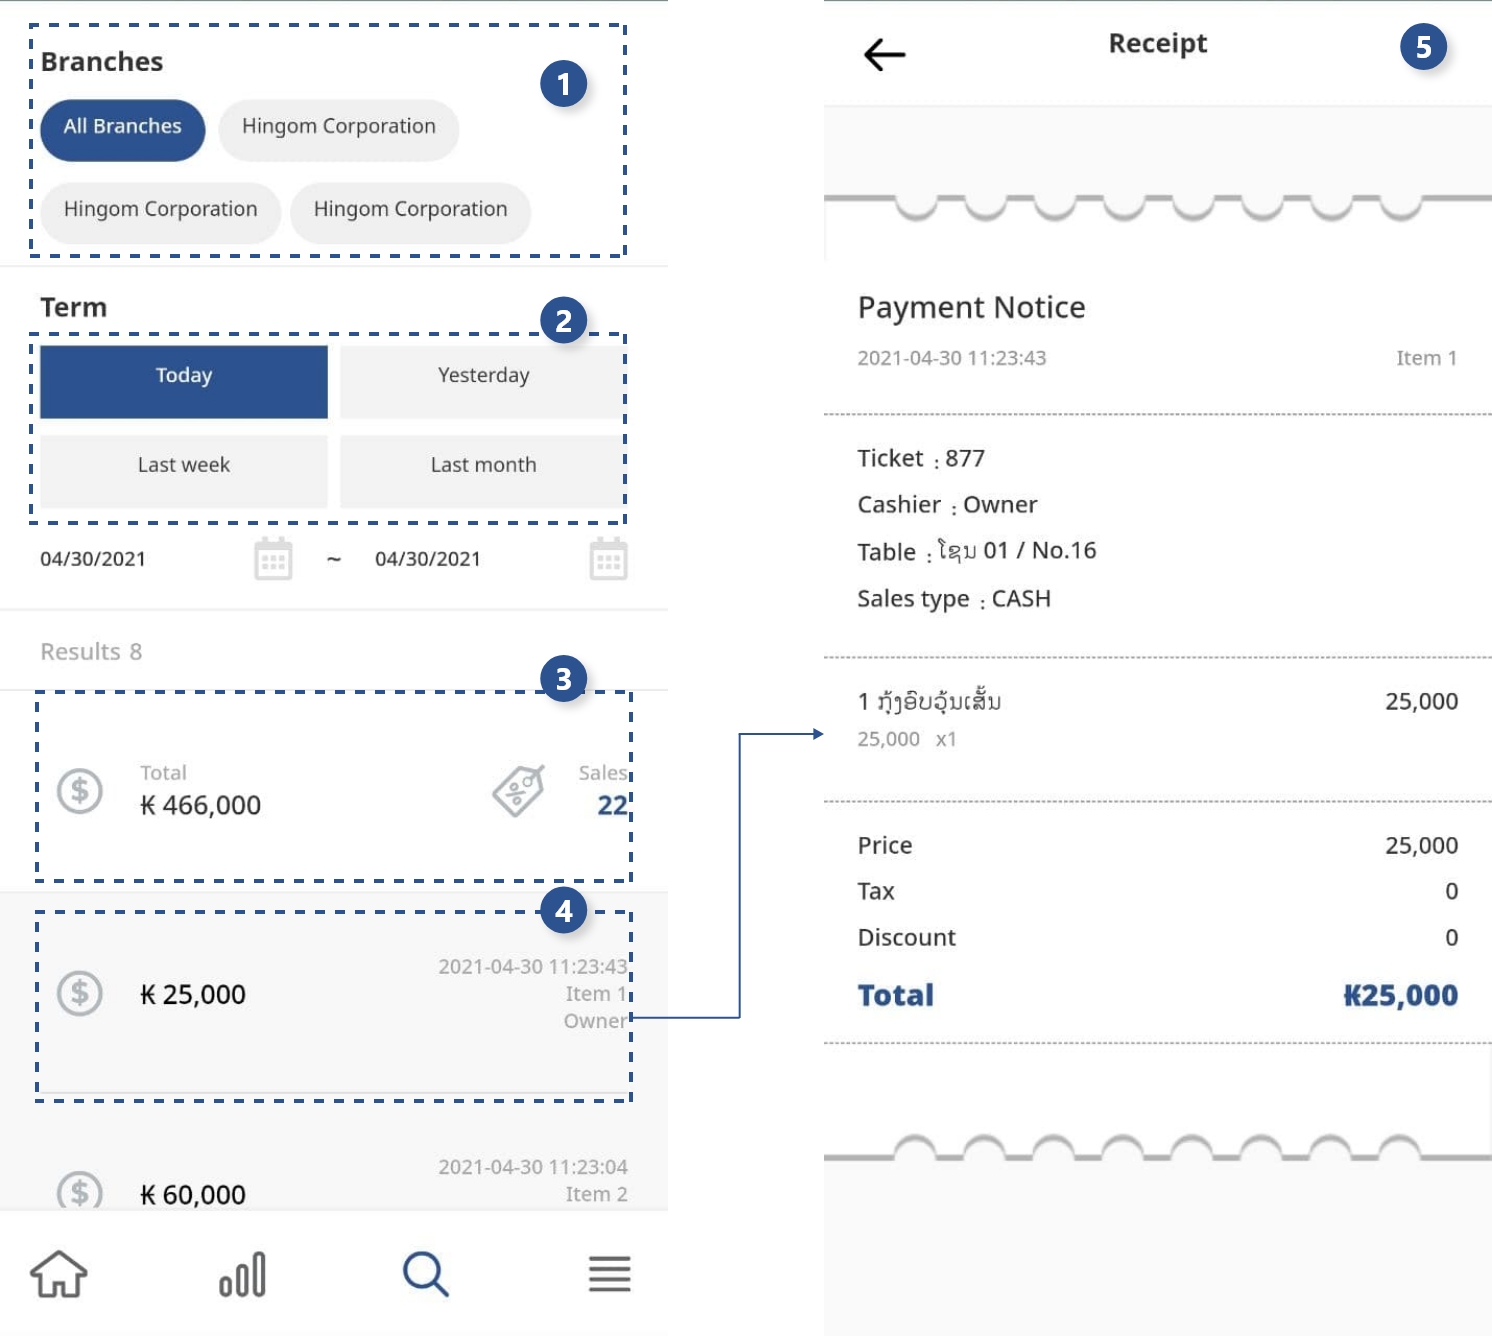
You can see the statistics of sales by branch and by date
1 Displaying a list of branches
2 specifying search conditions
3 total search results
4 selecting receipts
5 viewing receipts
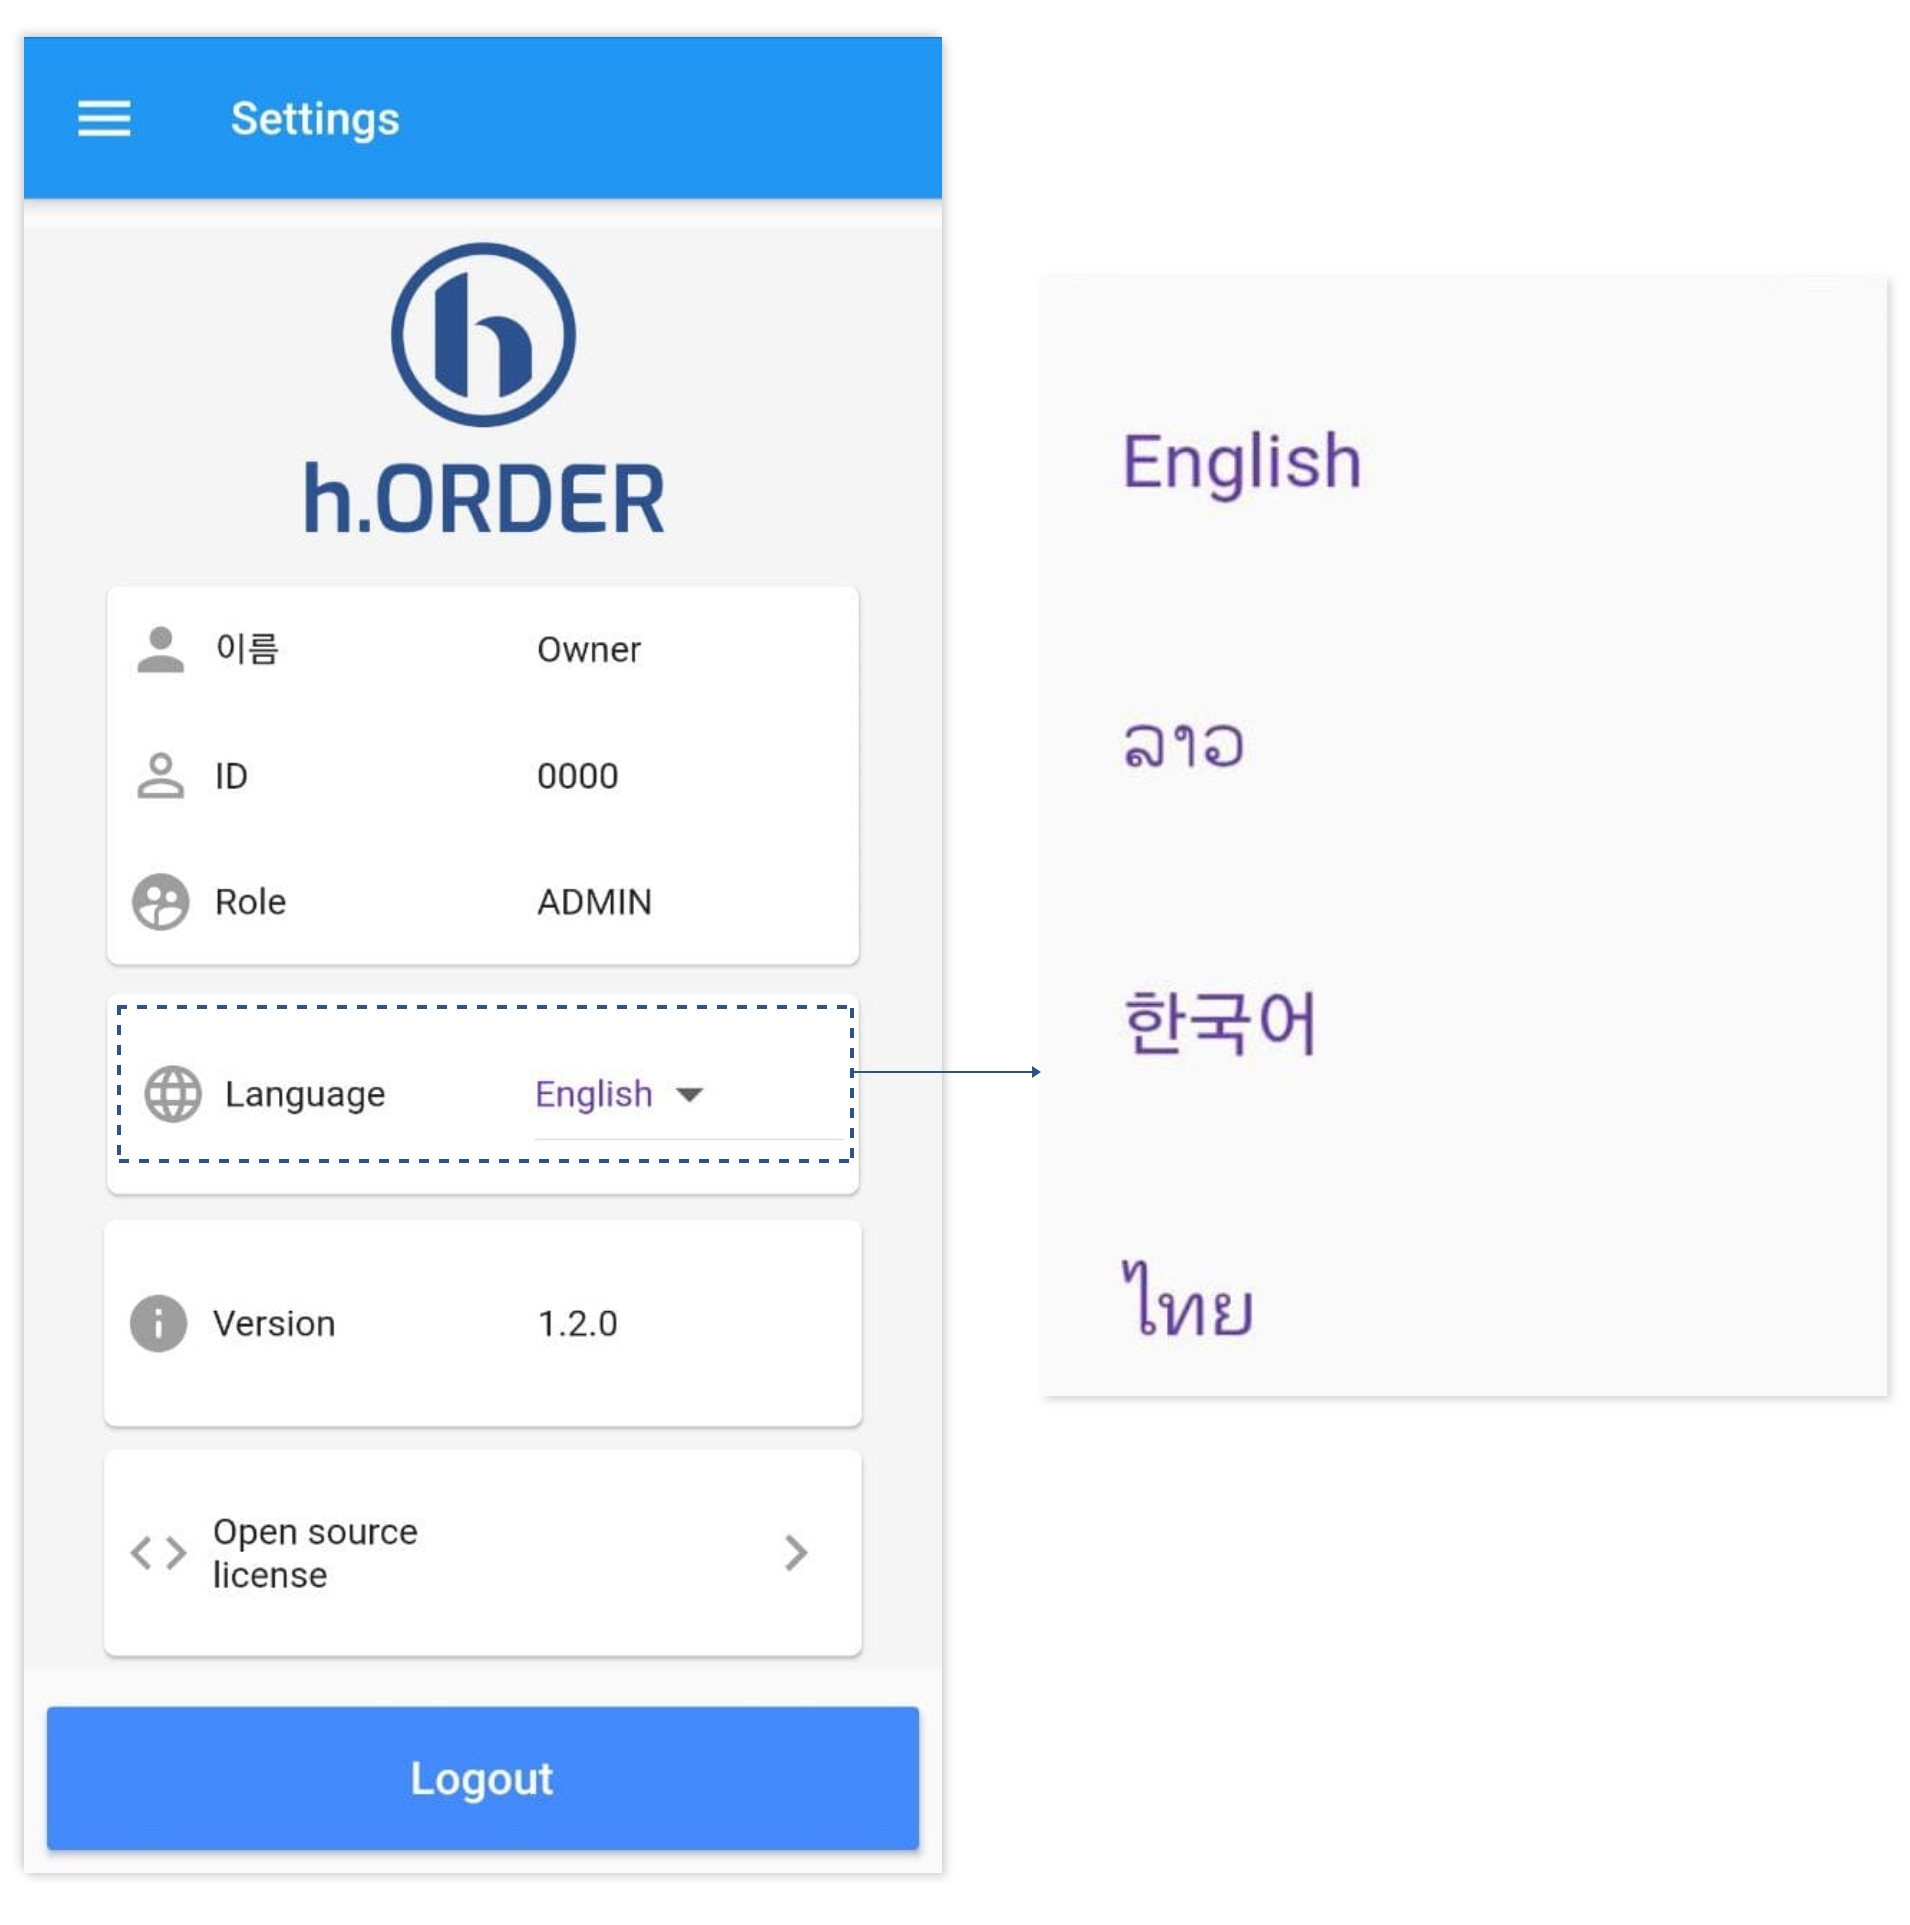
Change language setting
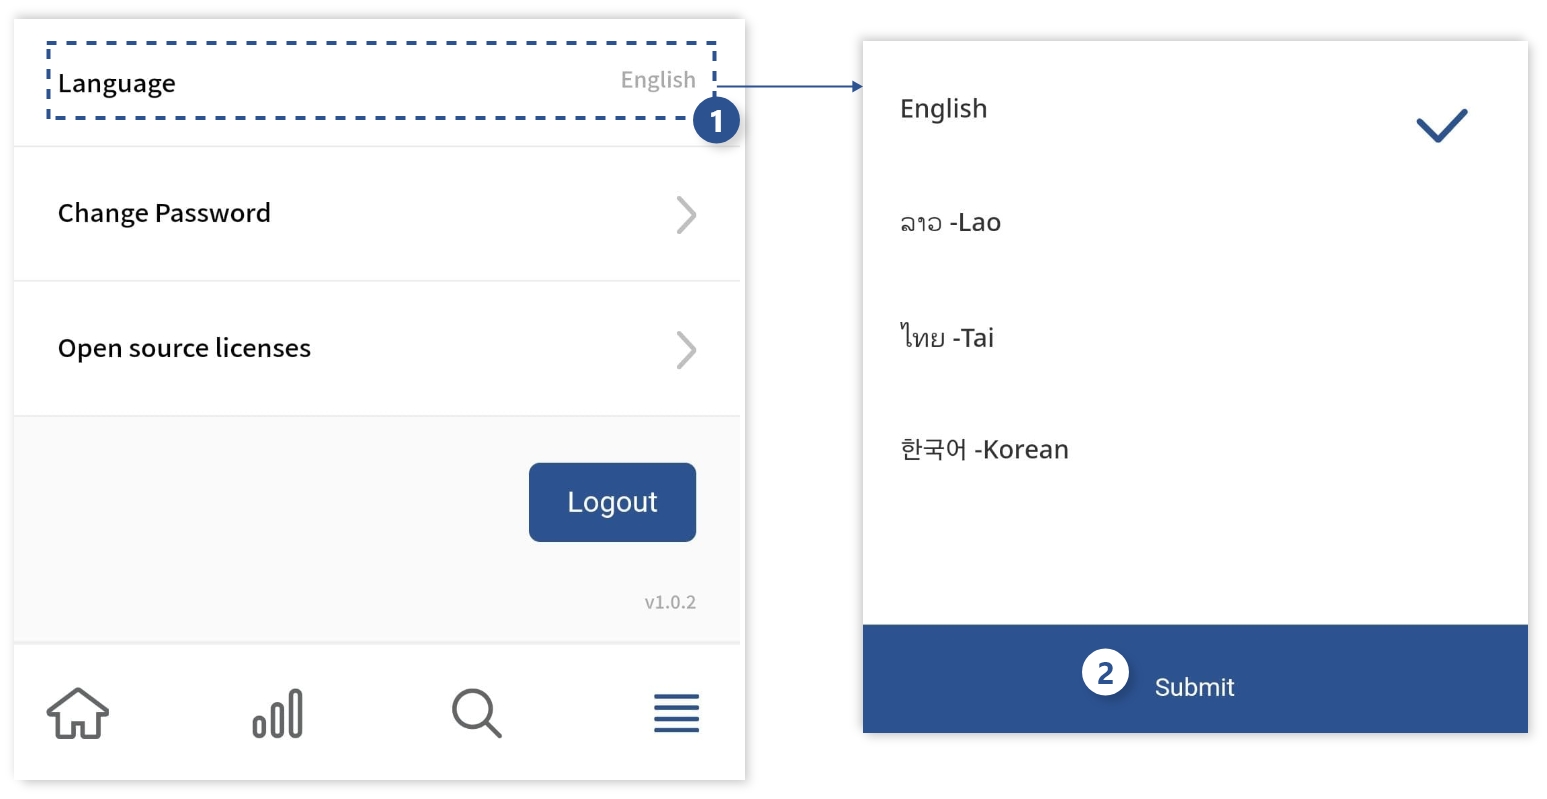
ENG, THAI, LAO, KOR language can be set
1 Click Language on the Setting screen
2 After selecting the language to change, click Submit
Change password settings
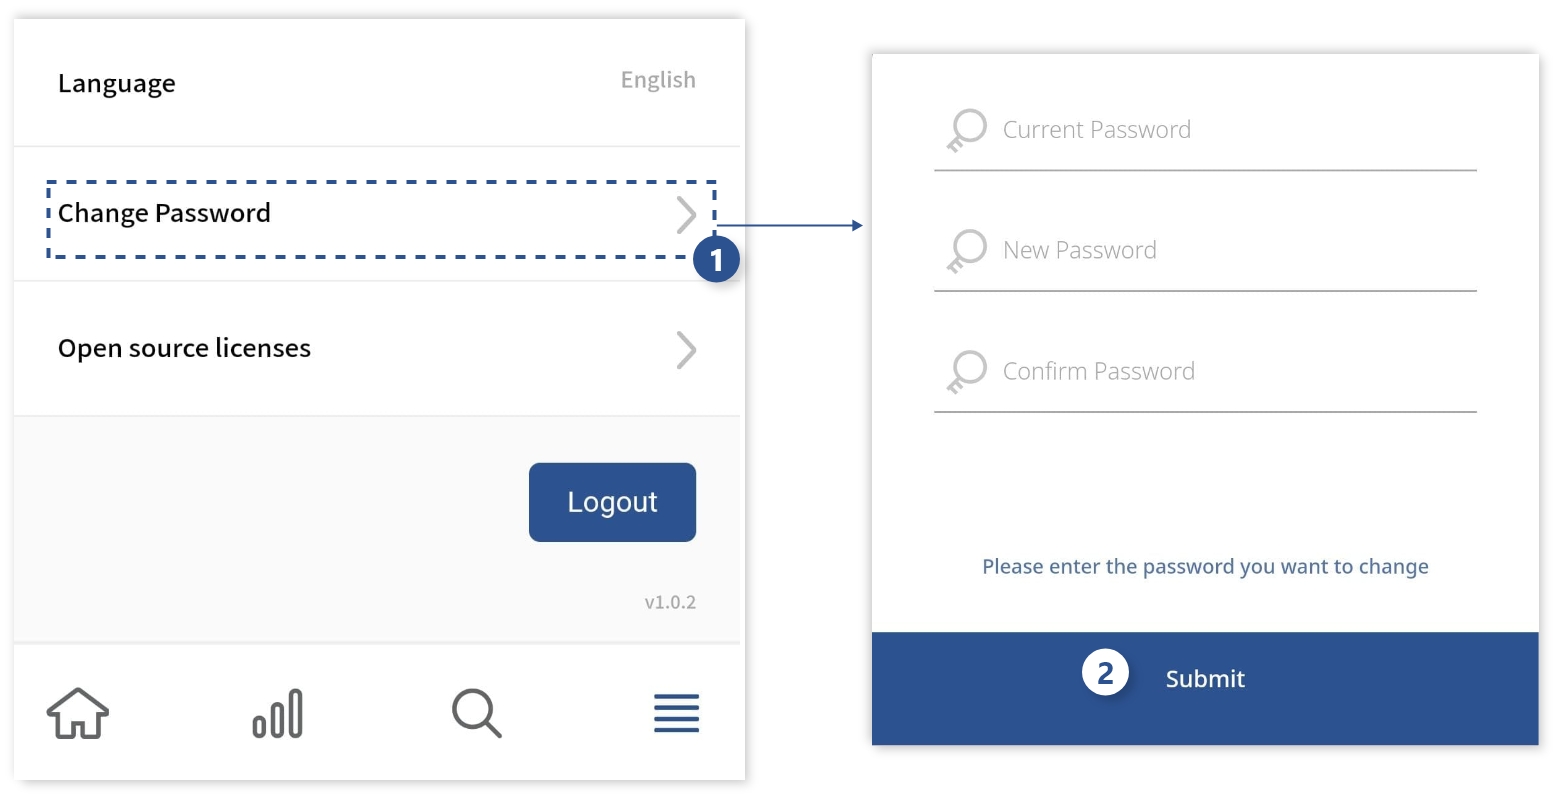
1 Click Change Password on the Setting screen
2 After entering the current password and the password to be changed, click Submit
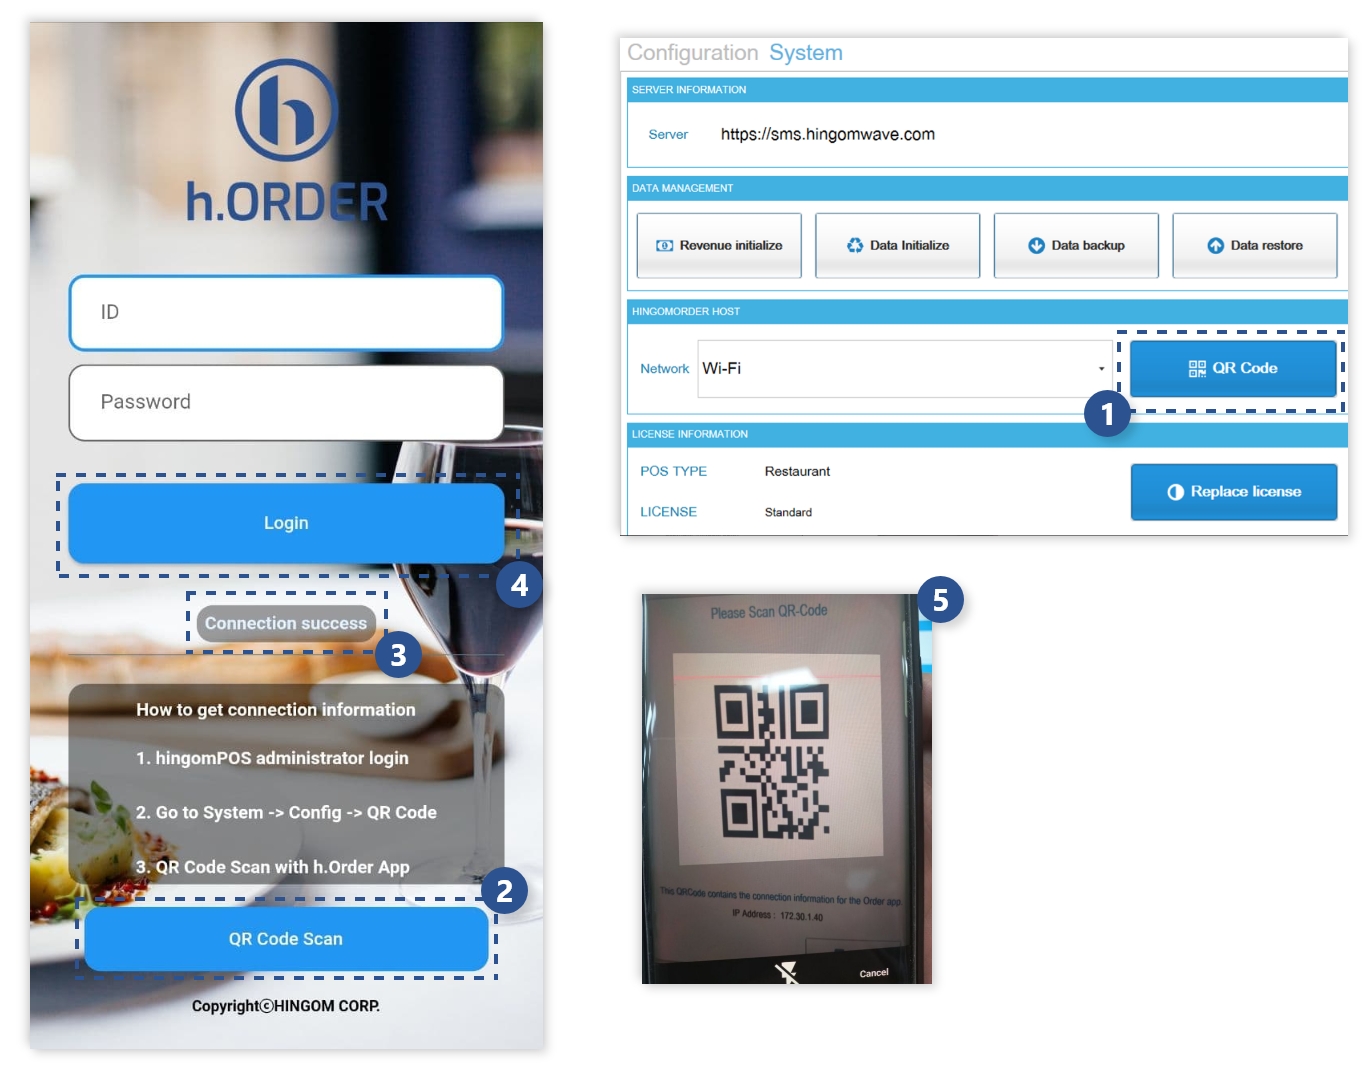
Connect with POS

First connection operation when running the app
h.ORDER is directly connected between POS and wifi zone
1 After logging in h.POS, click the System> config> QR CODE Scan button to check the QR code
2 Press the QR Code scan button on the app to scan the POS's QR code
3 When the connection is complete, the message Connection succes is displayed. (If there is no connection, check if it is the same wifi as the POS)
4 Enter the ID and password registered with the POS to log in. (ex, 0000/0000)
5 QR scan
Order
Order process
1 empty table selection
2 menu selection
3 shopping cart selection
4 order output
Register kitchen request
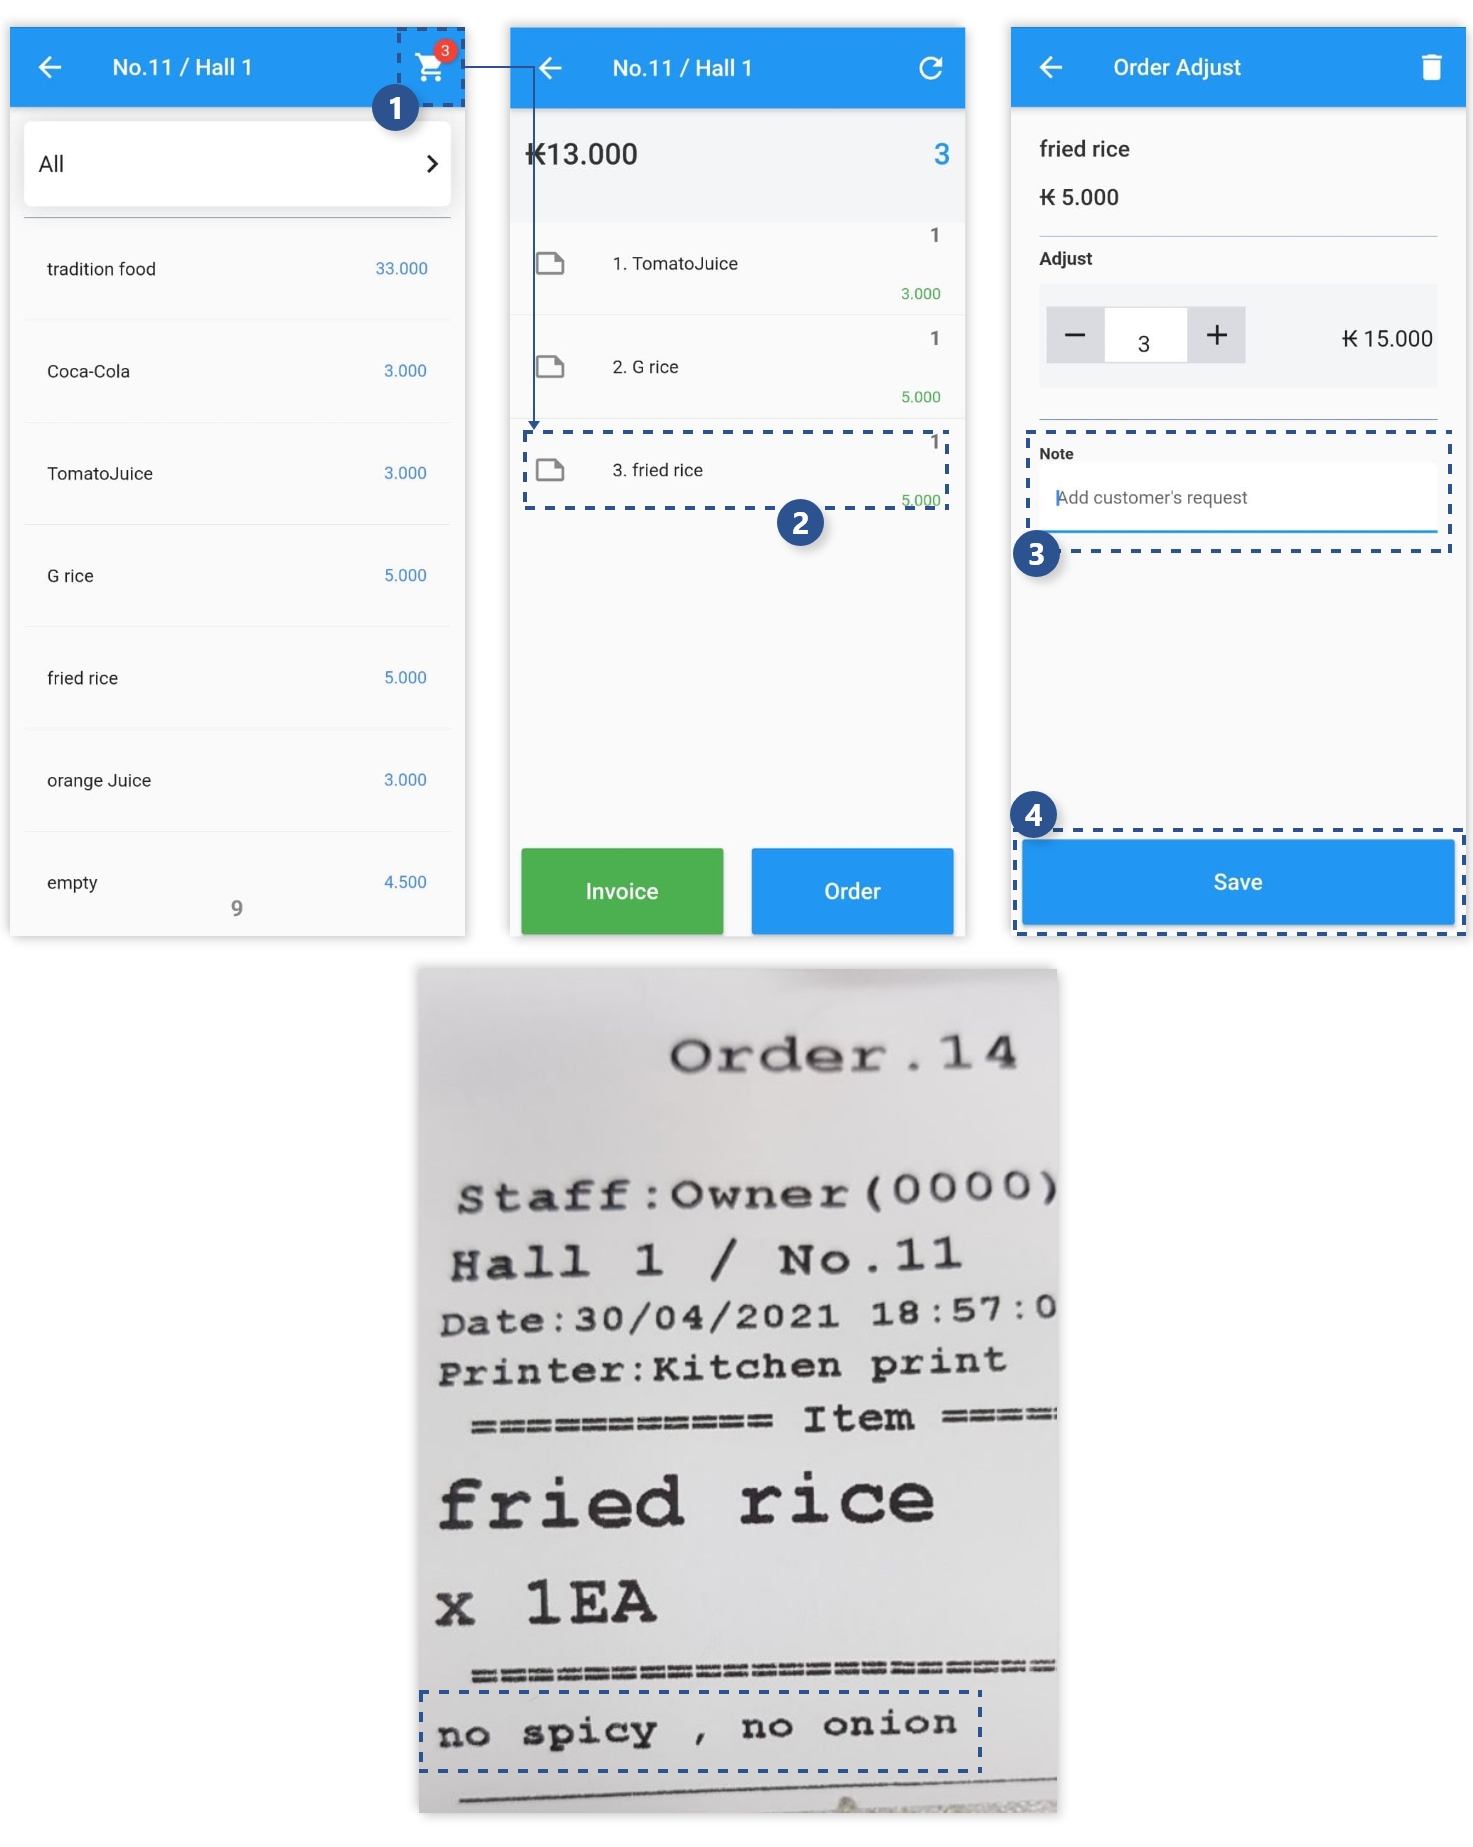
Add content to be delivered to the kitchen when ordering
1 select shopping cart
2 select menu
3 enter kitchen request
4 Print order form
INVOICE output
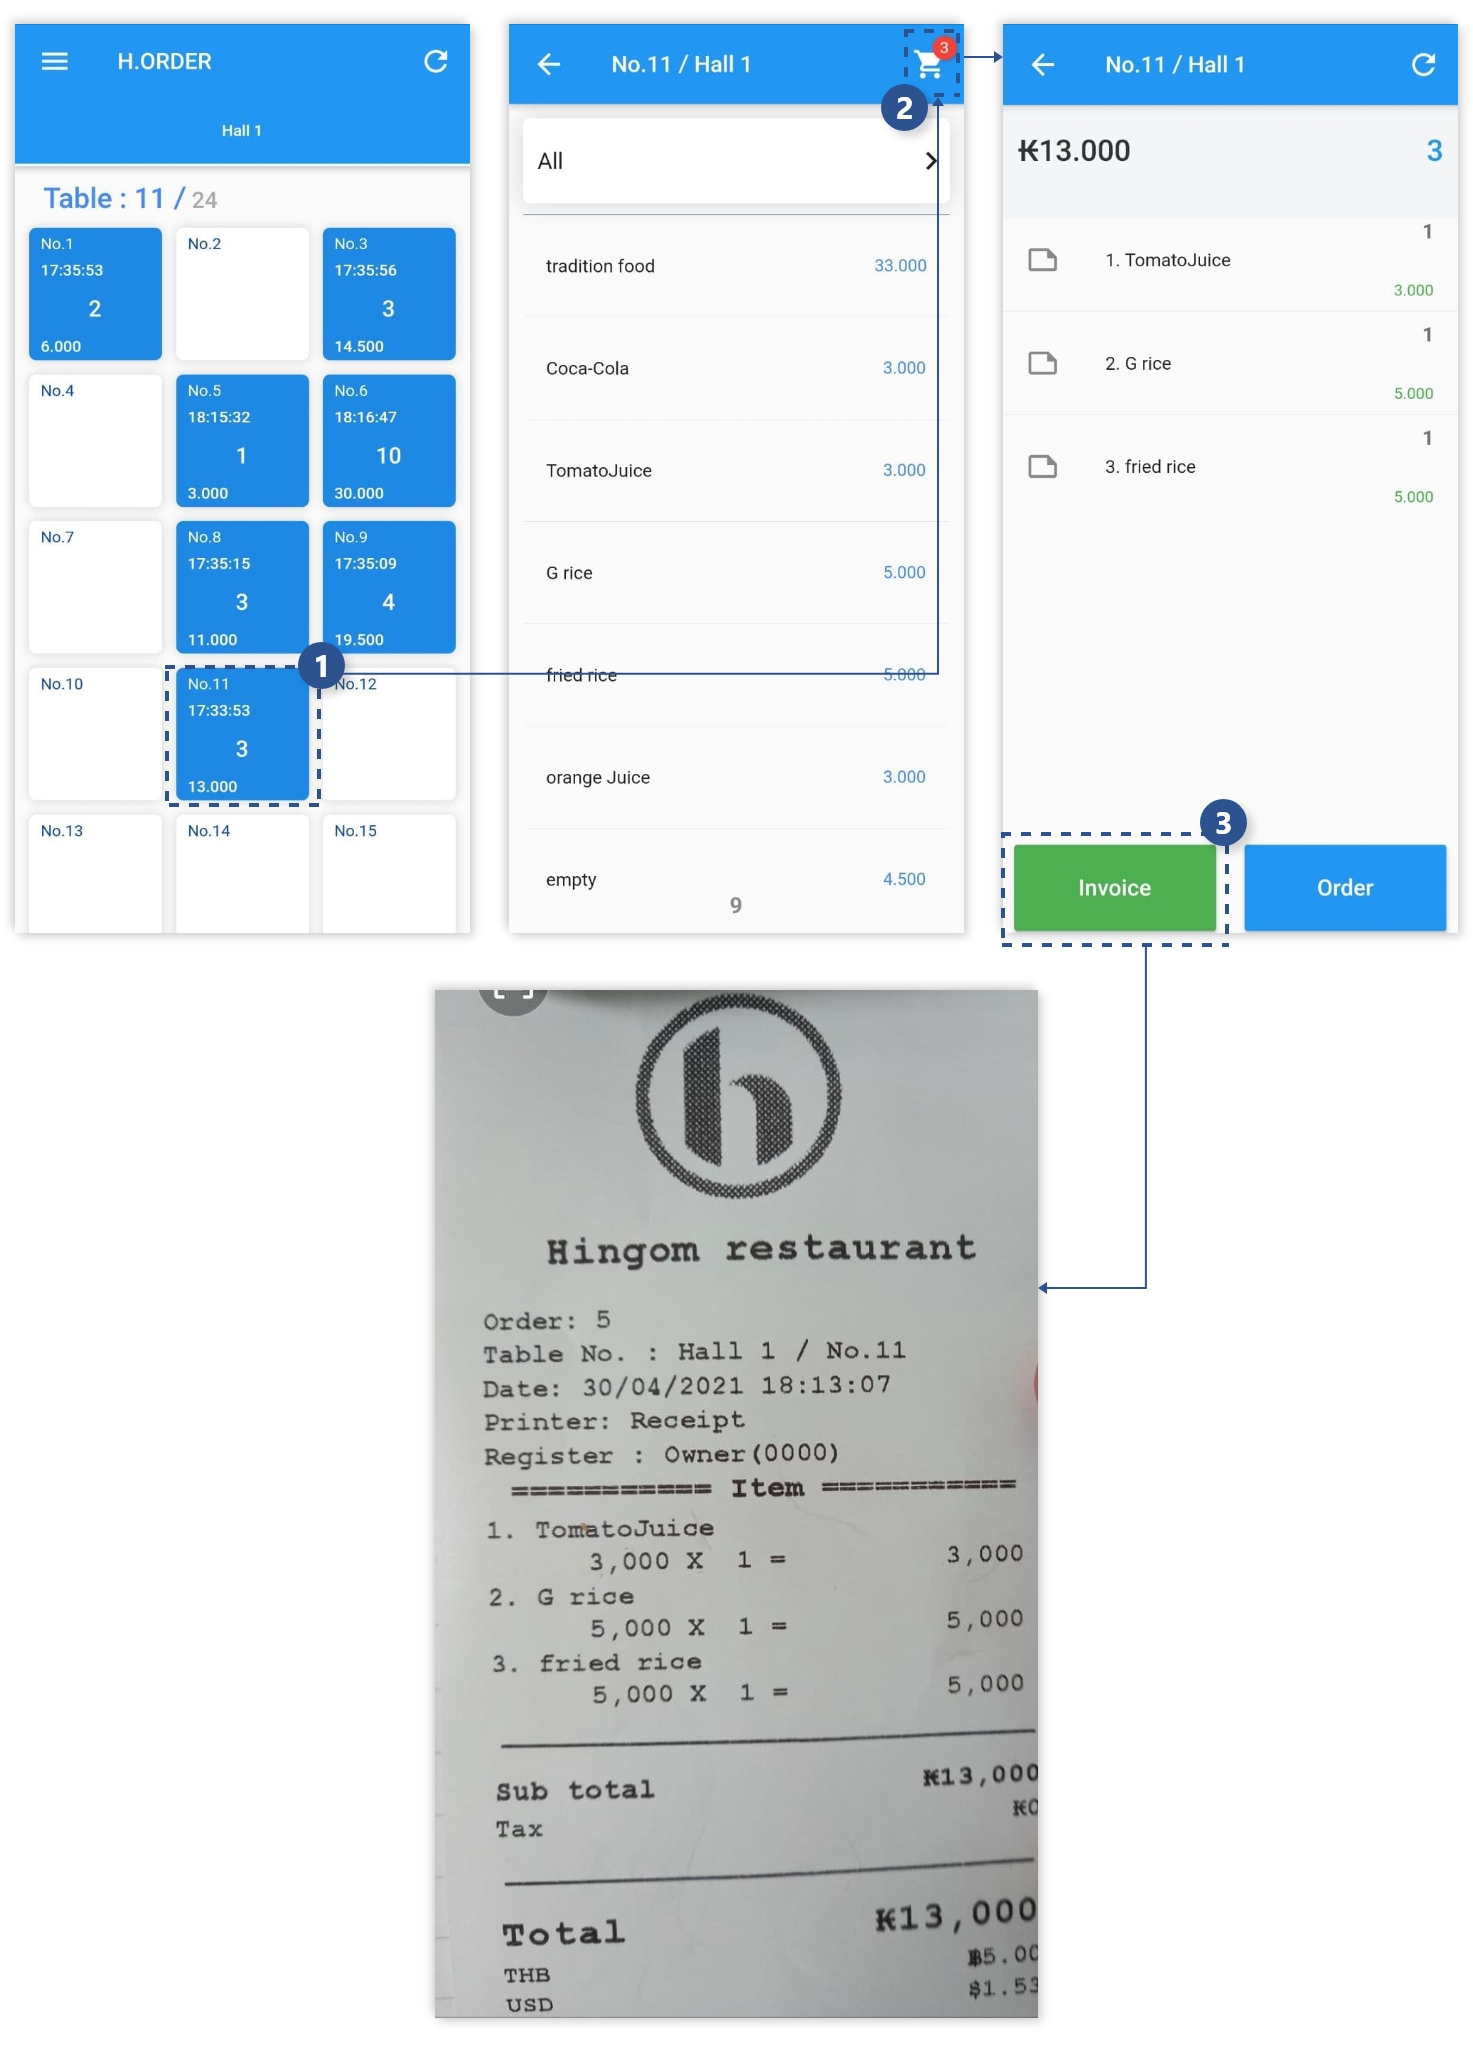
Receipt output
1 table selection
2 shopping cart click
3 invoice output
List of current orders
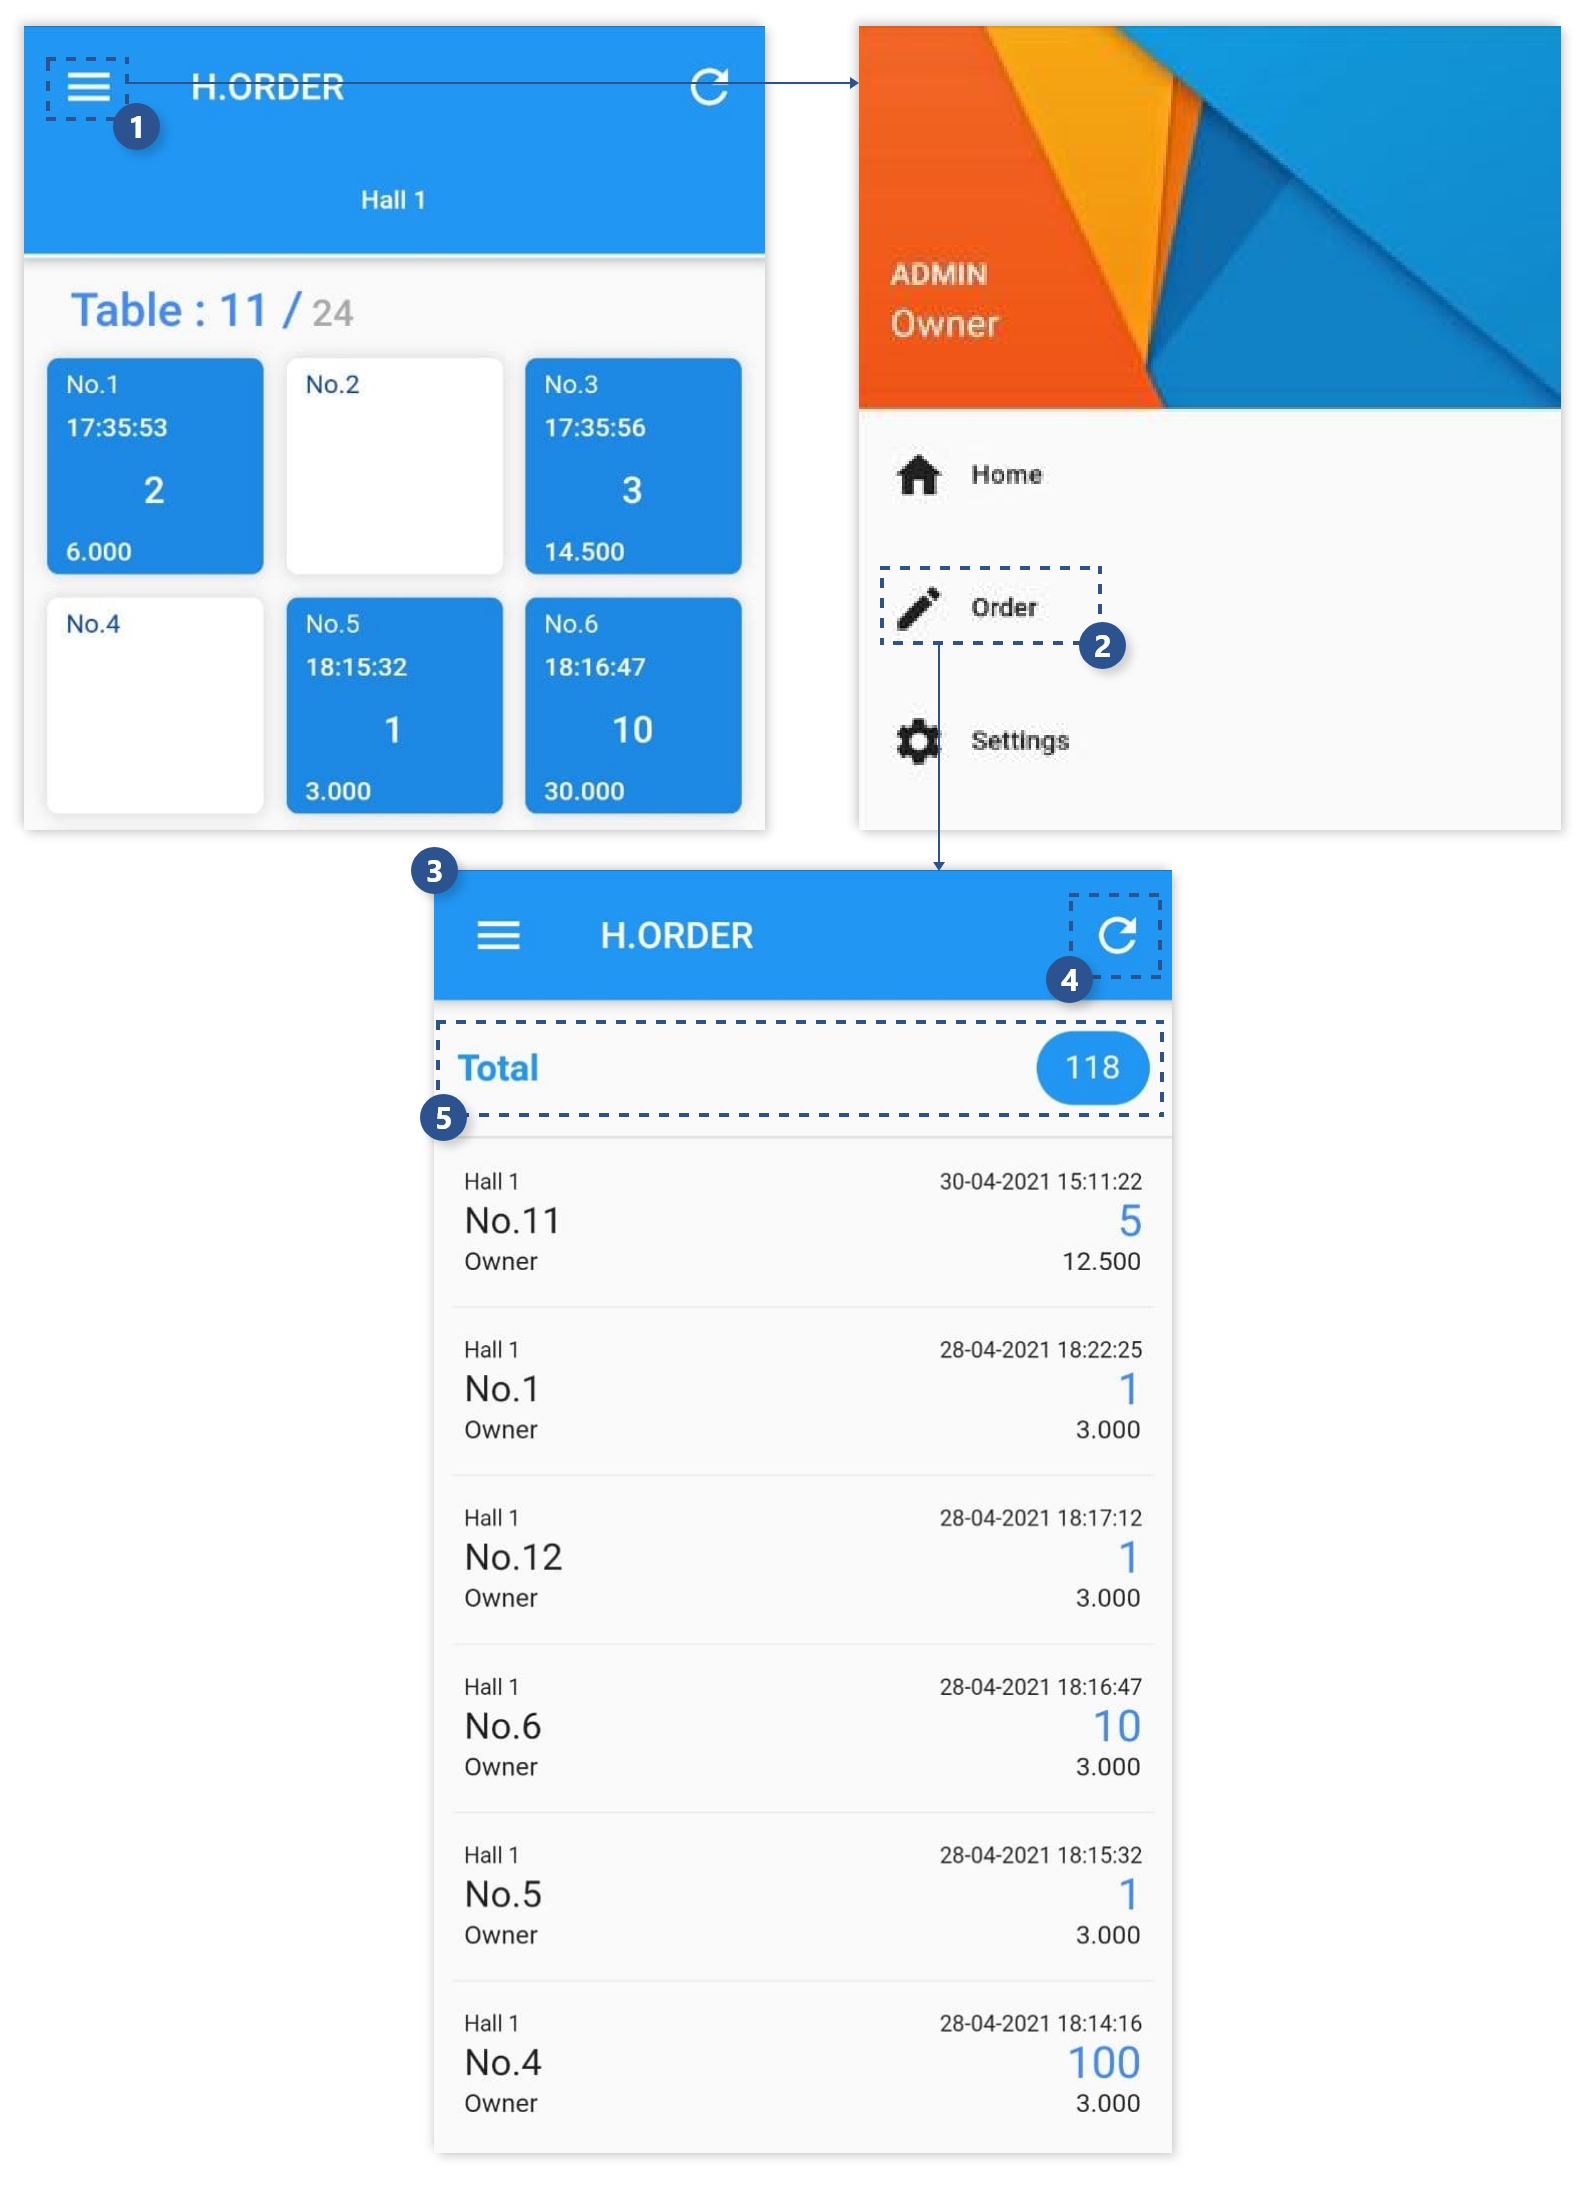
Screen when running App Login
1 sidebar
2 move to main screen
3 move to order screen
4 refresh
5 product total
Change language setting
ENG, THAI, LAO, KOR language can be set
1 Change after clicking Language
Video tutorials
- h.POS SW Introduction
- h.POS SW License activation
- Sales report
- Restaurant Table move and combine
- Add product by Excel(CSV format)
- Floor and Table Add
- Category Add
- Product Add
- Canceled Order for Restaurant
- Search for products without barcodes (Mini-Mart ver)
Remote assistance
Quick guide

- 첫번째설명
- 1 Visit https://anydesk.com/en and install the program

- 두번째설명
- 2 Click the button on the page to download

- 세번째설명
- 3 Please tell me the 9 digits shown here.

- 네번째설명
- 4 Click Accept when remote access is established
Always allow access
If the network goes down in the middle of remote assistance, we can get back on and keep supporting.

- 첫번째설명
- 1 Click Settings in the menu at the top right

- 두번째설명
- 2 Check Enable unattended access

- 세번째설명
- 3 Enter your password and click Apply
- 4 If you provide the password, we can access without approval